

You want to start anew with Minecraft in 2022 or are returning after a long break? In our guide we summarise all important updates and give you helpful basic tips as well as mod recommendations.
Some games feel like trying to catch up with a train that’s running full steam ahead. Minecraft, with its regular updates and ever-growing community, is one of them. The sandbox has been on the market for over a decade now, thrilling millions of players – and is a closed book for newcomers.
Because the block hit explains very little. If you want to find your way around the huge world, you have to try it out yourself. Or you can simply read our guide!
We summarise everything that has happened in Minecraft since its release and give you tips for your first steps. We’ll also introduce you to a few helpful mods to help you get started.
What (re-)beginners have missed
Since the release of Minecraft 1.0 in November 2011, the block building kit has received a lot of updates – sometimes big, sometimes small. We have summarised once again what has happened to Minecraft in the last few years:
- Minecraft 1.19 The Wild – 2022
The hotly anticipated update 1.9 The Wild is still pending. It is supposed to rework biomes like the birch forest or the swamps and introduce a new biome called The Deep Dark(How you can already play in the new update), our article explains. - Minecraft 1.18 Caves and Cliffs, Part 2 – November 2021
The second part of the update brought a total of eight new biomes as well as new cave shapes that make exploring the world even more exciting.
- Minecraft 1.17 Caves and Cliffs, Part 1 – June 2021
What was initially planned as one big update was released in two parts to take some pressure off the development team. Part 1 of the Caves and Cliffs update brought many new blocks like copper and new animals like mountain goats and even axolotls! - Minecraft 1.16 Nether Update – June 2020
Update 1.16 is considered by many to be the most impressive Minecraft update in recent years. It not only brought new biomes, new mobs and structures, but also completely reworked the Nether, so that a visit to the other dimension is now really worthwhile. - Minecraft 1.15 Buzzy Bees – December 2019
This update introduced bees and with them new mechanics. In addition, update 1.15 corrected many existing bugs. - Minecraft 1.14 Village and Pillage – April 2019
Update 1.14 reworked a lot of things about the villages and their inhabitants – for example, they became more adapted to their biomes. The trade was reworked so that you can get valuable items more easily. In addition, 1.14 also brought raids to villages. - Minecraft 1.13 The Update Aquatic – July 2018
Update 1.13 brought more variety and life to the underwater world of Minecraft. New mobs, blocks, items and structures were introduced for the aquatic pools. - Minecraft 1.12 The World of Color Update – June 2017
Update 1.12 dipped the Minecraft world into all the colours of the rainbow as it brought concrete blocks in 16 shades, glazed ceramics and beds that can now be coloured. - Minecraft 1.11 The Exploration Update – November 2016
Update 1.11 also brought the forest estates, where servants, mages and pests spawn. Mages now also drop a totem of immortality when defeated. - Minecraft 1.10 The Frostburn Update – June 2016
New blocks like the magma block or the red nether brick were introduced. The polar bear found its way into the game with this update and zombies and skeletons were also reworked in the snow biome. - Minecraft 1.9 The Combat Update – June 2016
Update 1.9 overhauled Minecraft’s combat system, making it a little more challenging. In addition, this update also introduced the so-called Elytren wings, which players can use to glide through the air. - Minecraft 1.8 The Bountiful Update – September 2014
This update brought many new textures for blocks, new items and creatures. In addition, the performance of Minecraft was improved. - Minecraft 1.7 The Update That Changed the World – October 2013
Update 1.7 changed the Minecraft world by introducing new biomes such as the Birch Forest, Flower Forest, and the Savannah. - Minecraft 1.6 The Horse Update – July 2013
As the name suggests, update 1.6 brought the horse into the game, which as a mount has since made travel over long distances more enjoyable. - Minecraft 1.5 Redstone Update – March 2013
The update was a dream come true for Redstone lovers as it brought new items that made experimenting with Redstone mechanics even more fun. - Minecraft 1.4.2 The Pretty Scary Update – October 2012
The update brought minor changes such as flower pots, carrots and potatoes or the invisibility potion. But also the Wither, a Nether boss monster that doesn’t just spawn, but has to be created by the player. - Minecraft 1.3.1 – August 2012
Compared to its predecessors, this update brought many new features. Among them: Jungle and desert temples, books, trading with NPC villagers, emeralds and more. - Minecraft 1.2.1 – March 2012
This update brought a new jungle biome. Furthermore, for example, ocelots or redstone lamps were also added. - Minecraft 1.1 – January 2012
The first update did not bring a lot of new features. But it introduced, for example, spawn eggs for the creative mode, with which players can make different creatures appear in the world. - Minecraft 1.0 – November 2011
After about two years of alpha and beta phases, version 1.0 saw the light of day and counts as the release version of the sandbox on PC.
The 5 most important tips for beginners
It is impossible to cover all aspects of Minecraft in one guide. But if you’re diving into the block world for the first time (or after a long time), we’ve put together 5 beginner tips that will at least explain the basics of the game.
1. your first workbench
In Minecraft, you start with nothing. You have no weapons, no equipment, no tools. You do have your fists, though, so let’s make use of them first. What would only give you bloody knuckles in real life, gives you wood in Minecraft – chop down the nearest forest. You will need this raw material for your first crafting attempts.
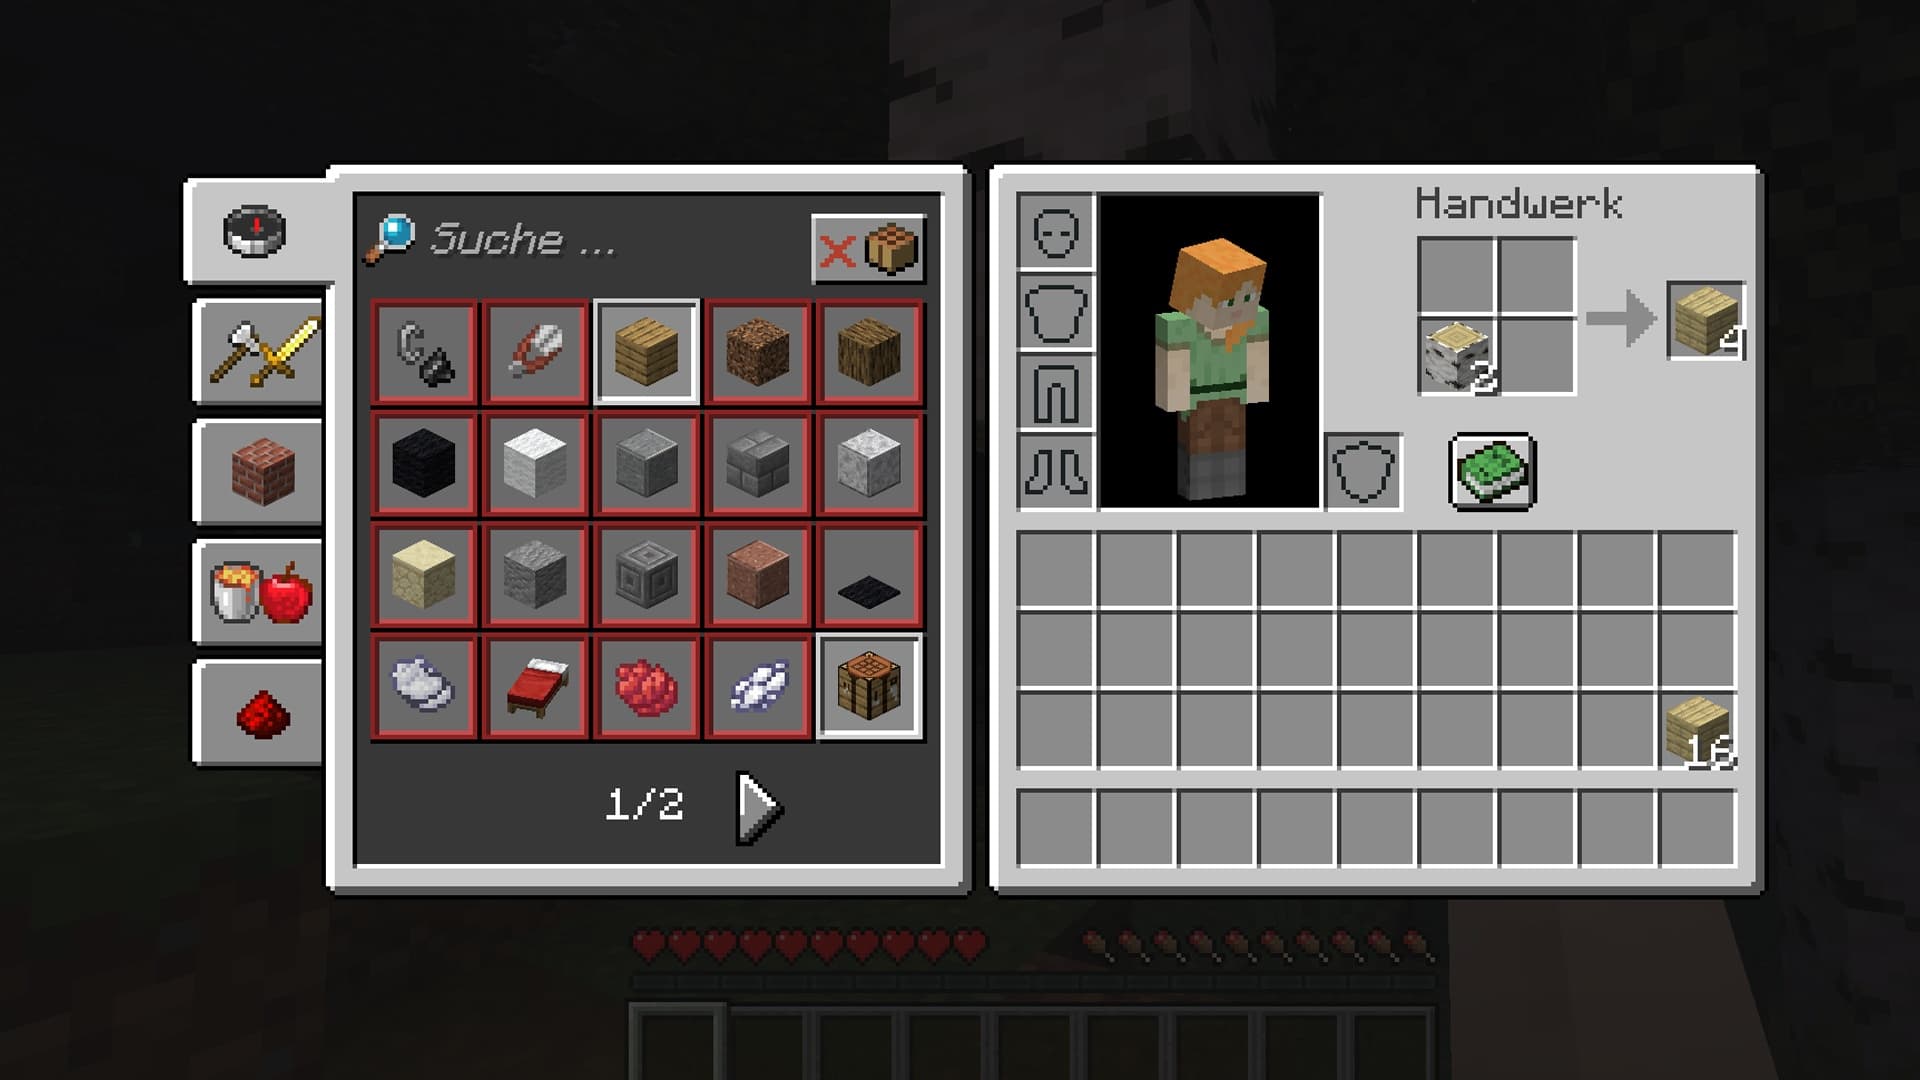
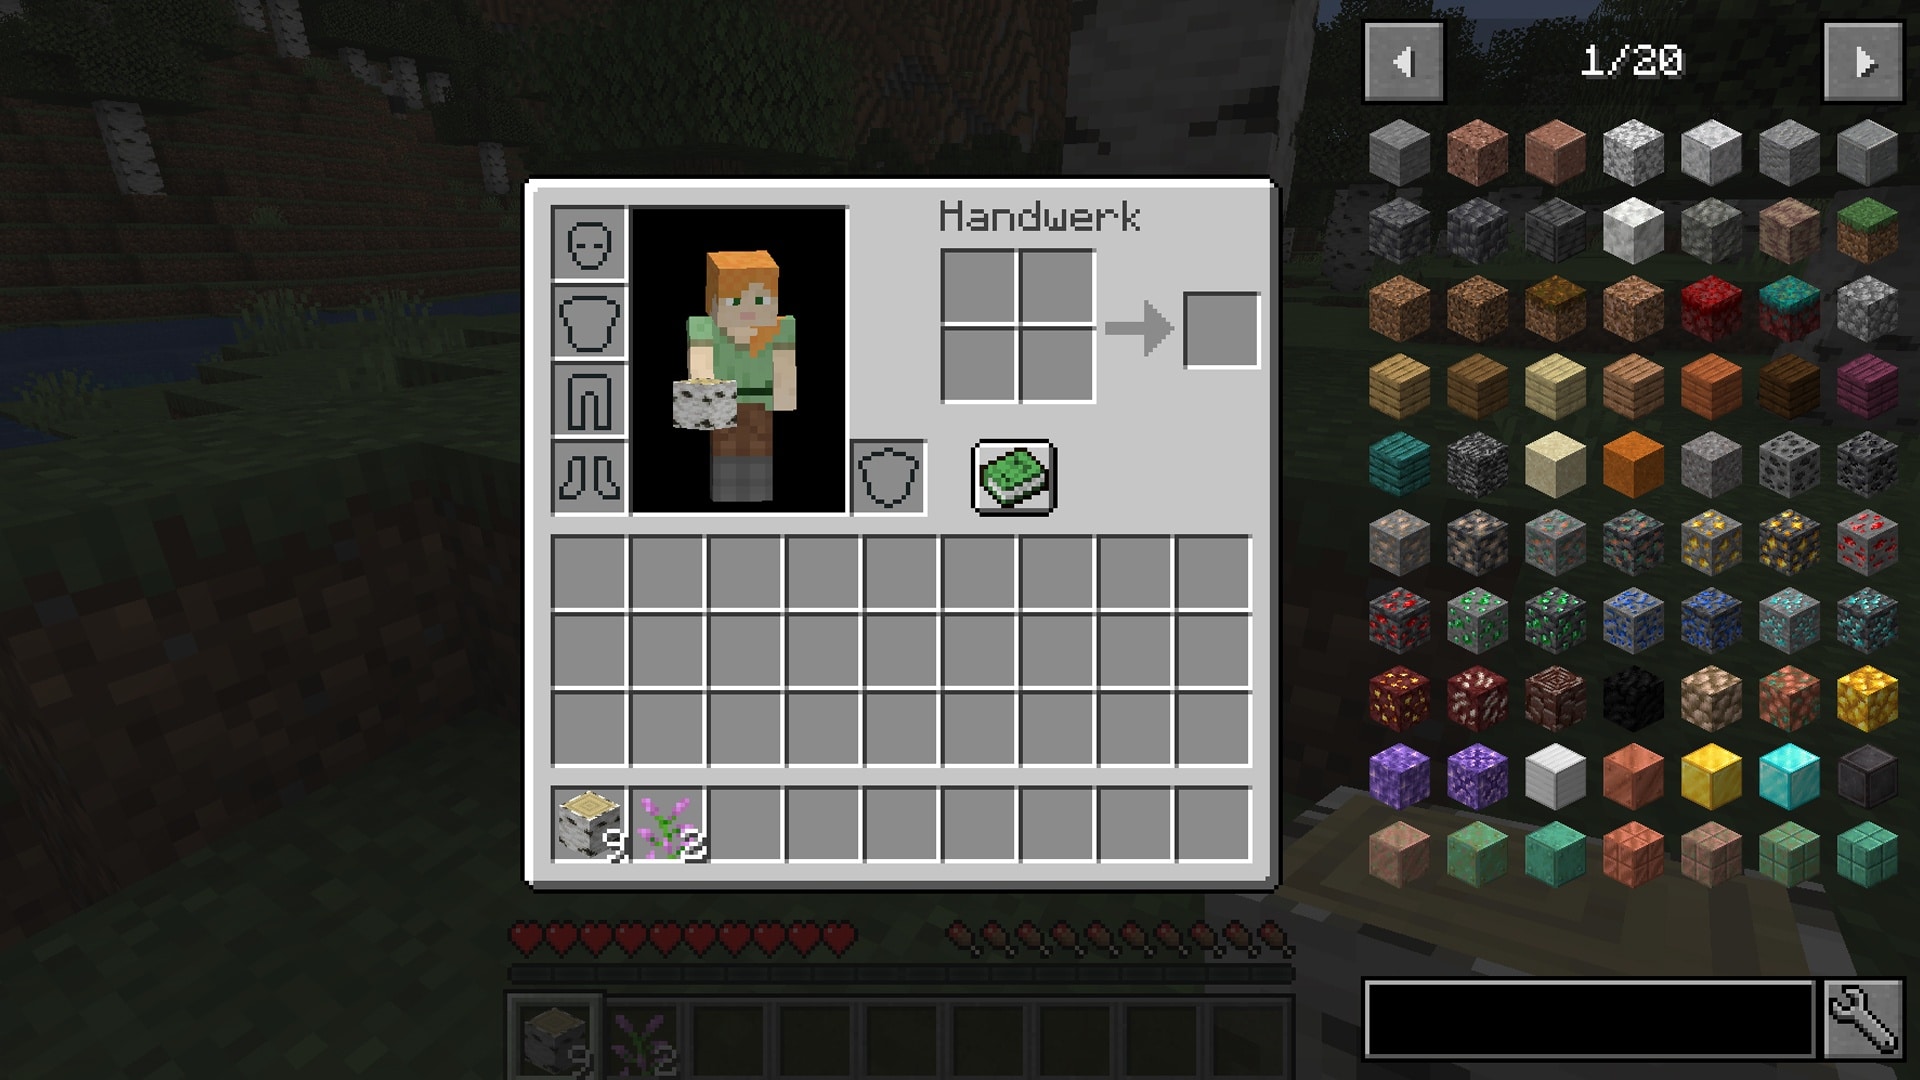
Once you have collected some wood, you can build a workbench. To do this, open your inventory with the “E” key and place your wood in the crafting square. The wood will now be turned into wooden boards.
If you now combine four wooden boards, you already have your workbench. Drag it into the quickbar and place it in the world by right-clicking. Right-click again to open the workbench.
See our pictures for a better understanding:
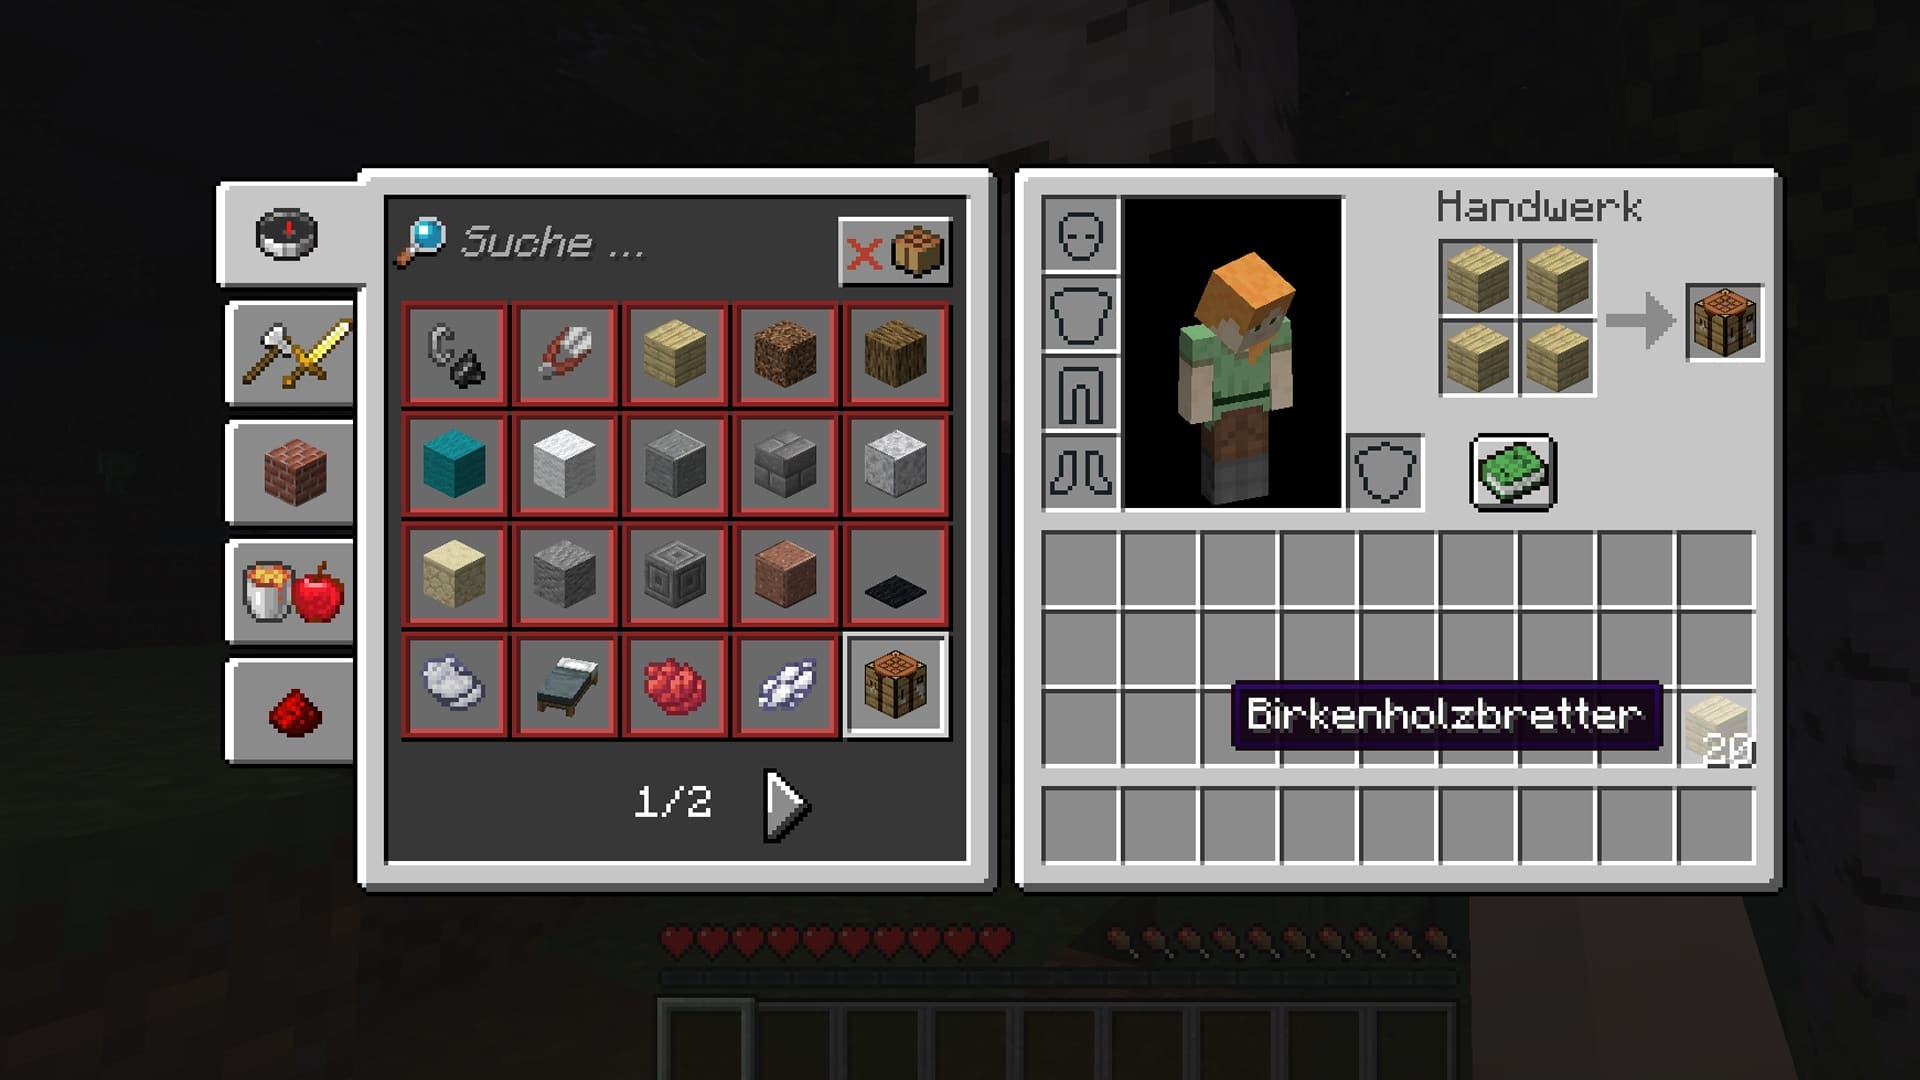
You are now in possession of a wonderful workbench – the first gateway to the crafting world of Minecraft. When you open the workbench, you will already see items on the left that you can potentially craft here. Items for which you do not have enough materials are greyed out.
2. your first tools
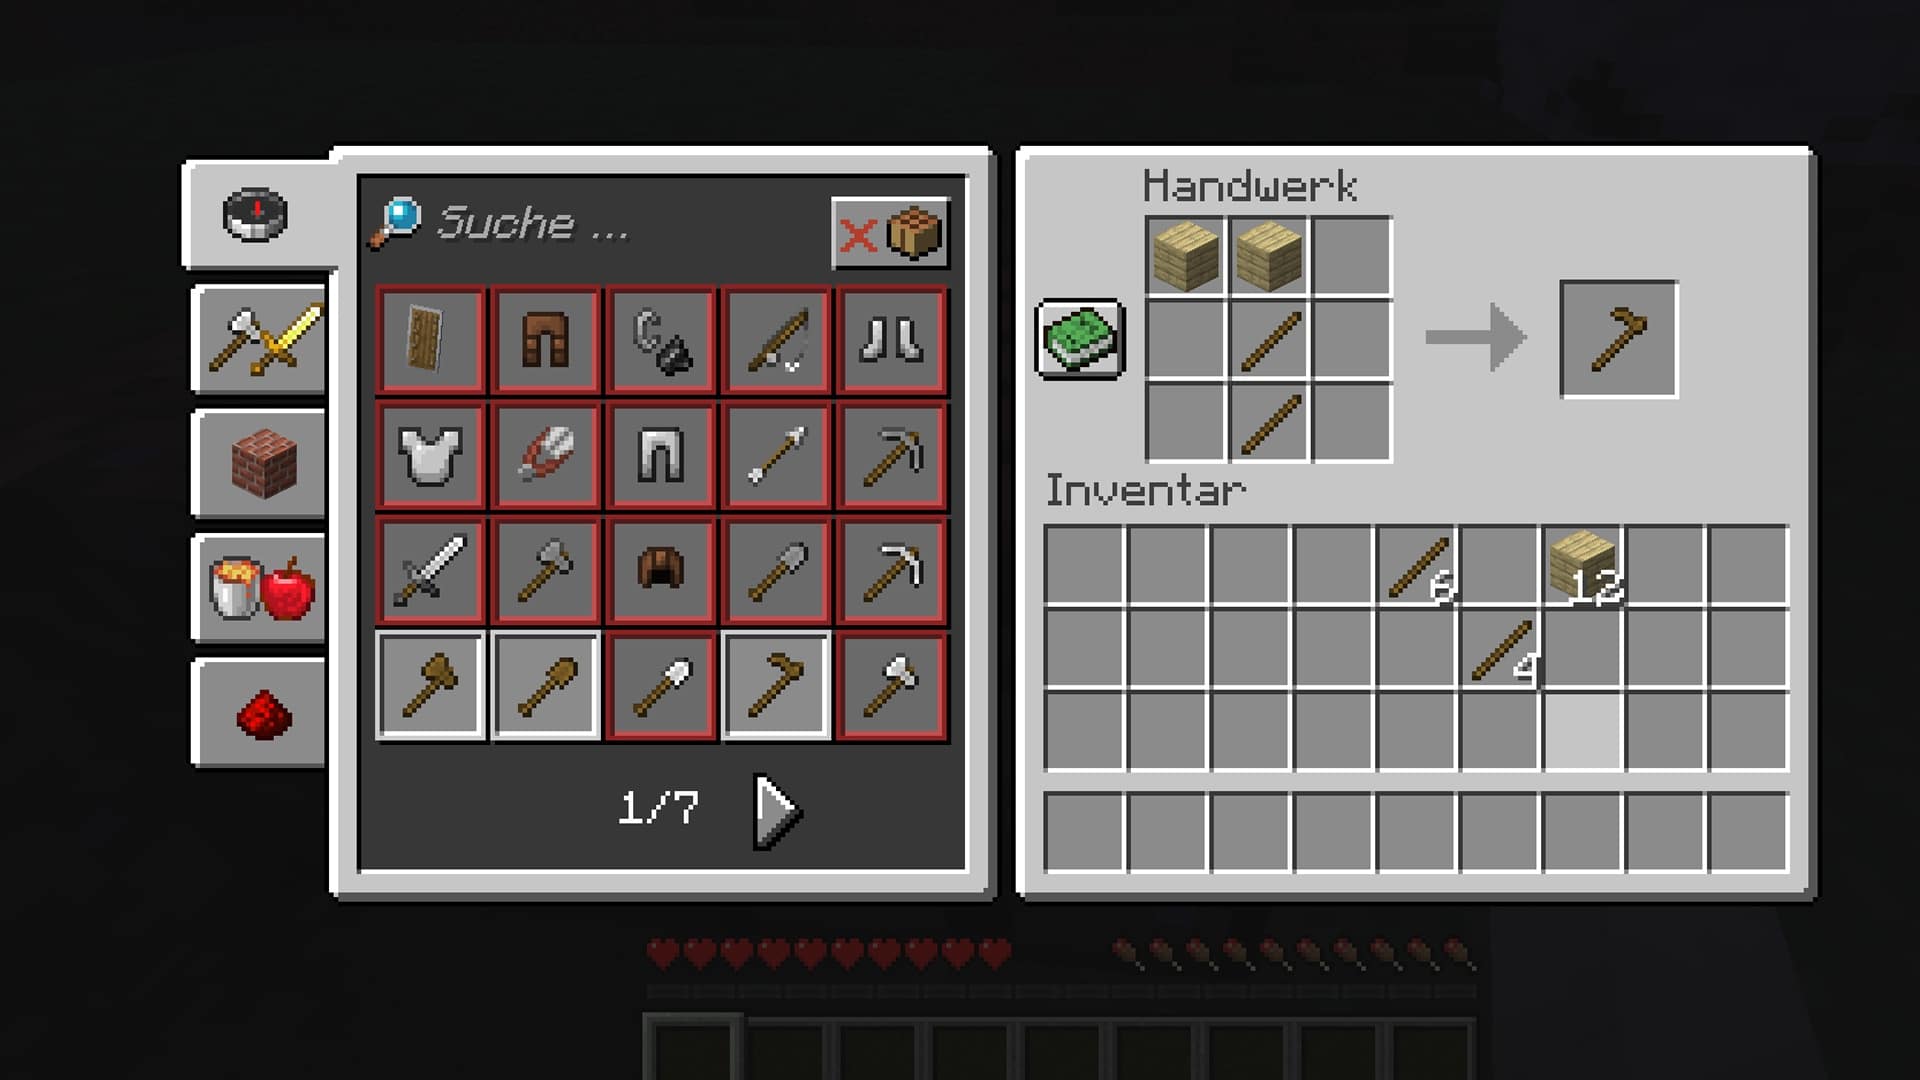
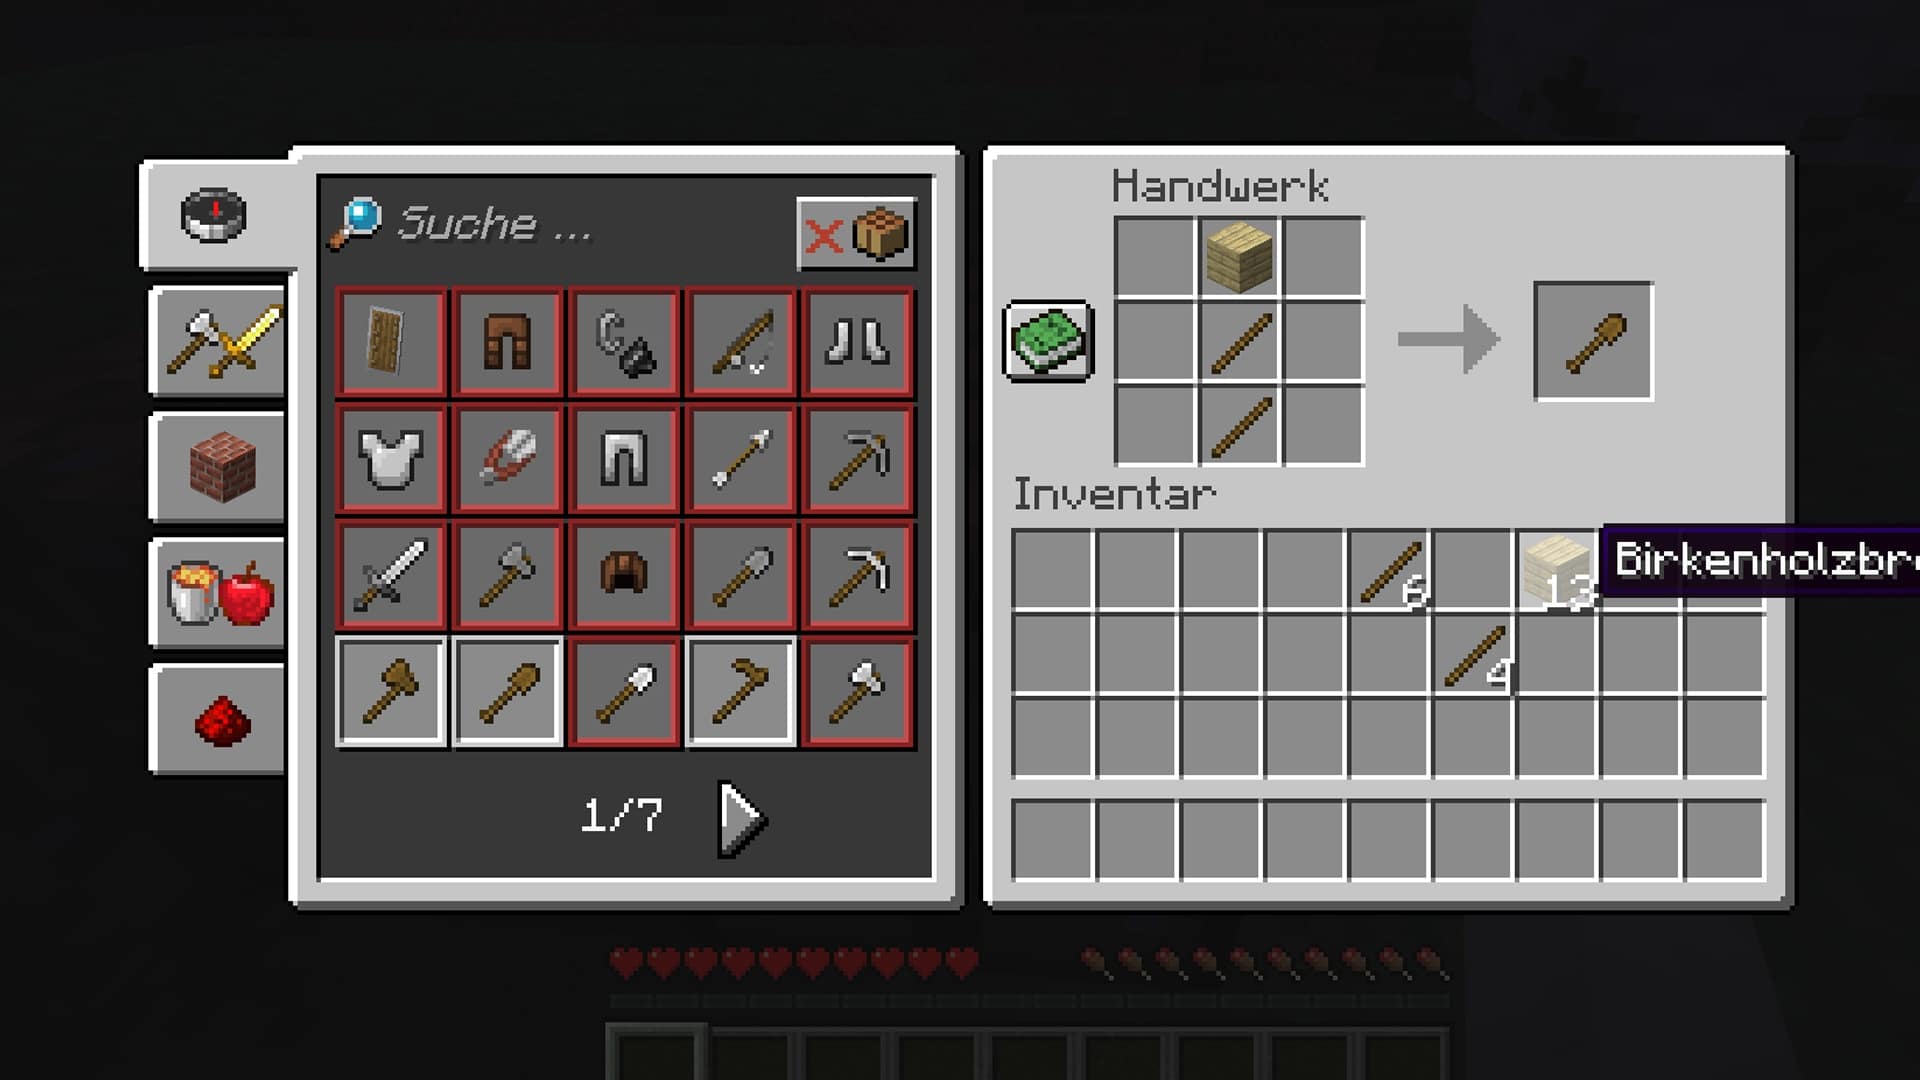
You will need sticks for your first tools. You can get them by combining two wooden boards like this:
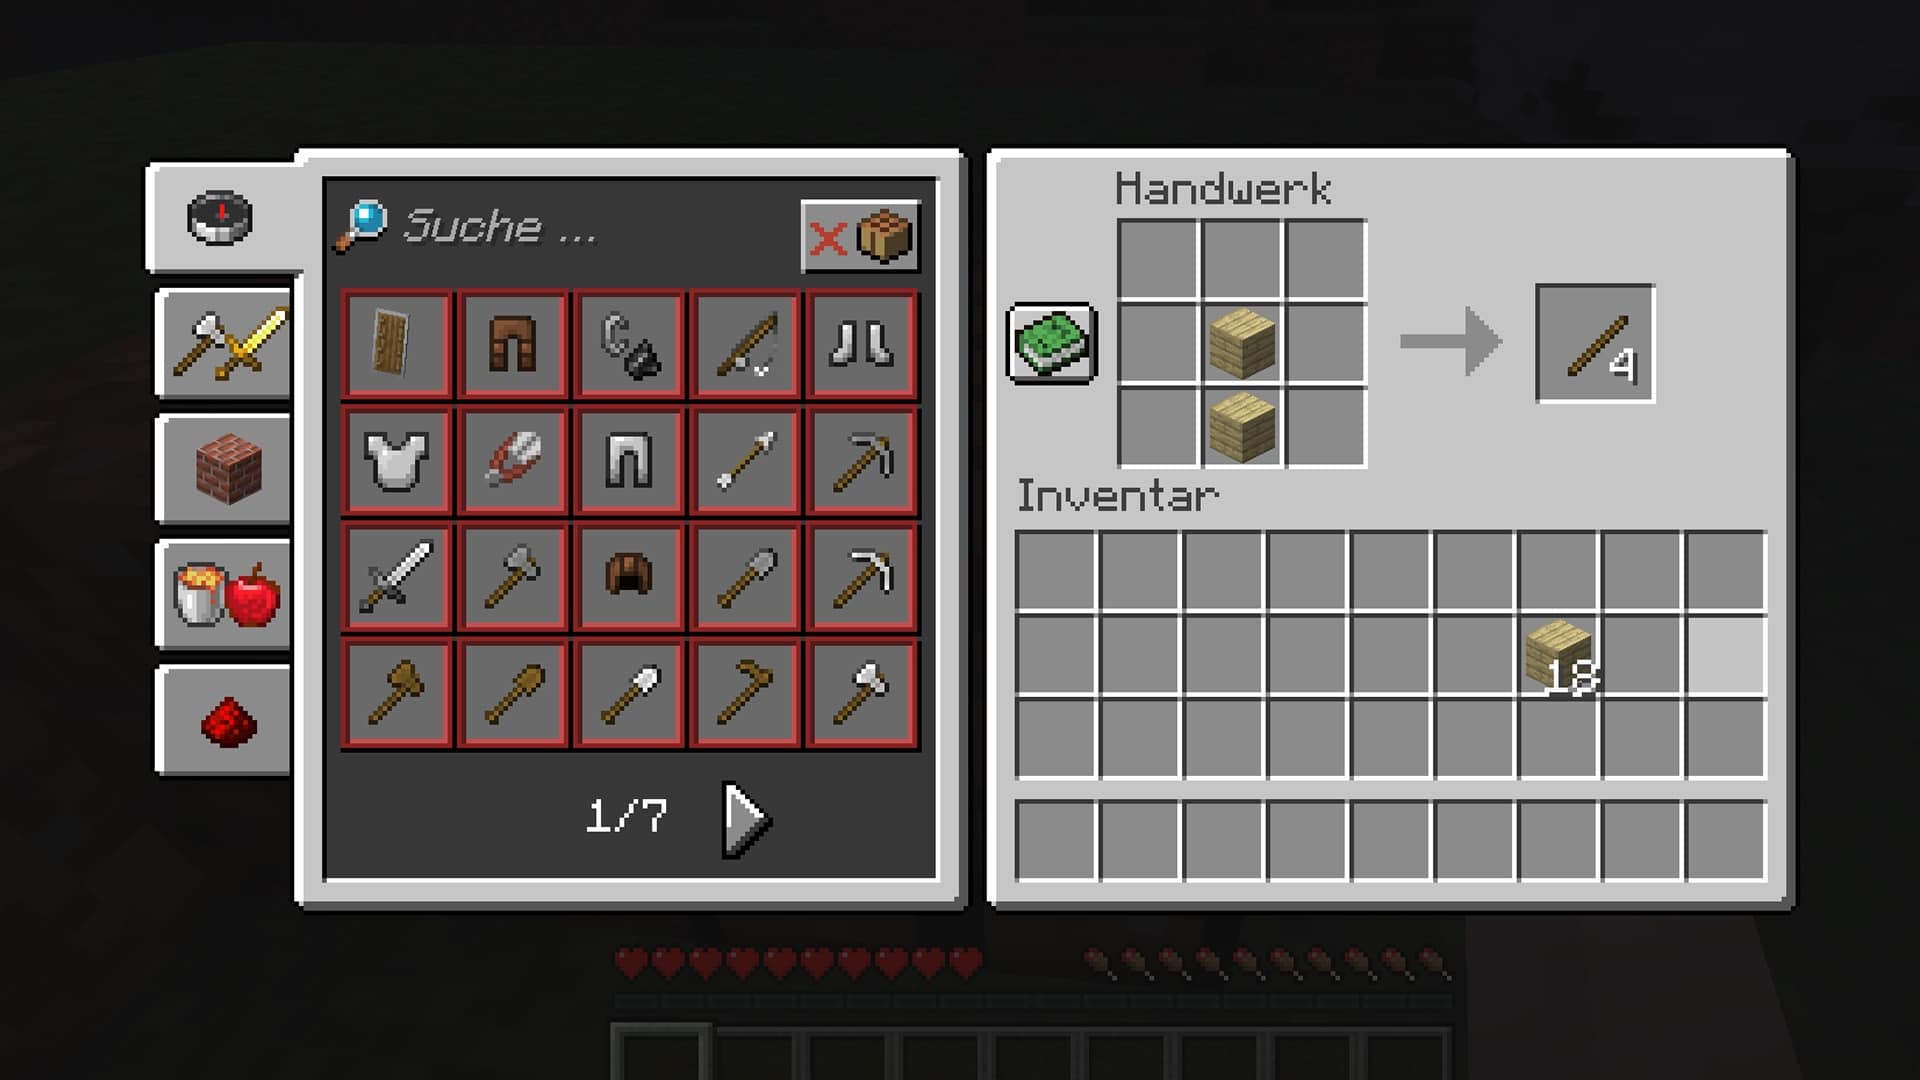
To make wooden tools, you have to combine sticks and wooden boards. You can get the different patterns for the tools by selecting them from the workbench menu on the left. Alternatively, you can look at our pictures and copy them:
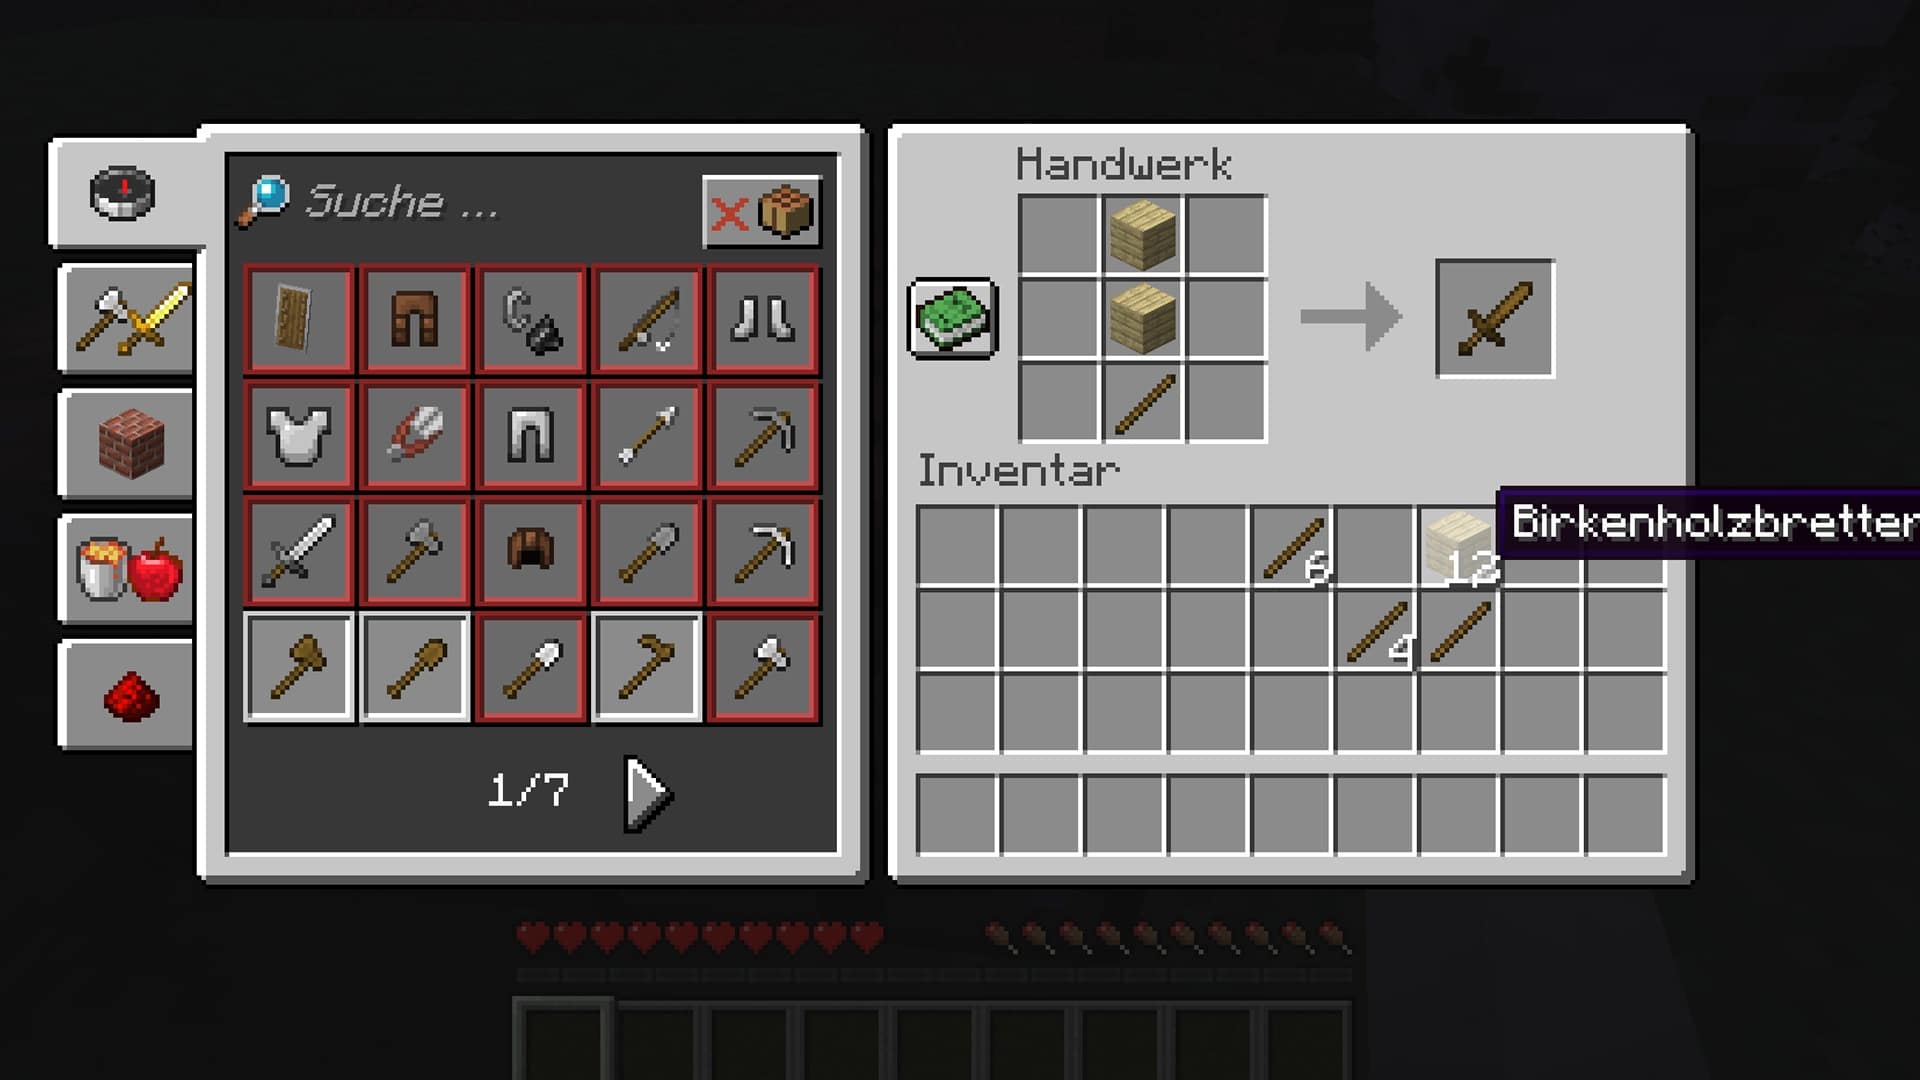
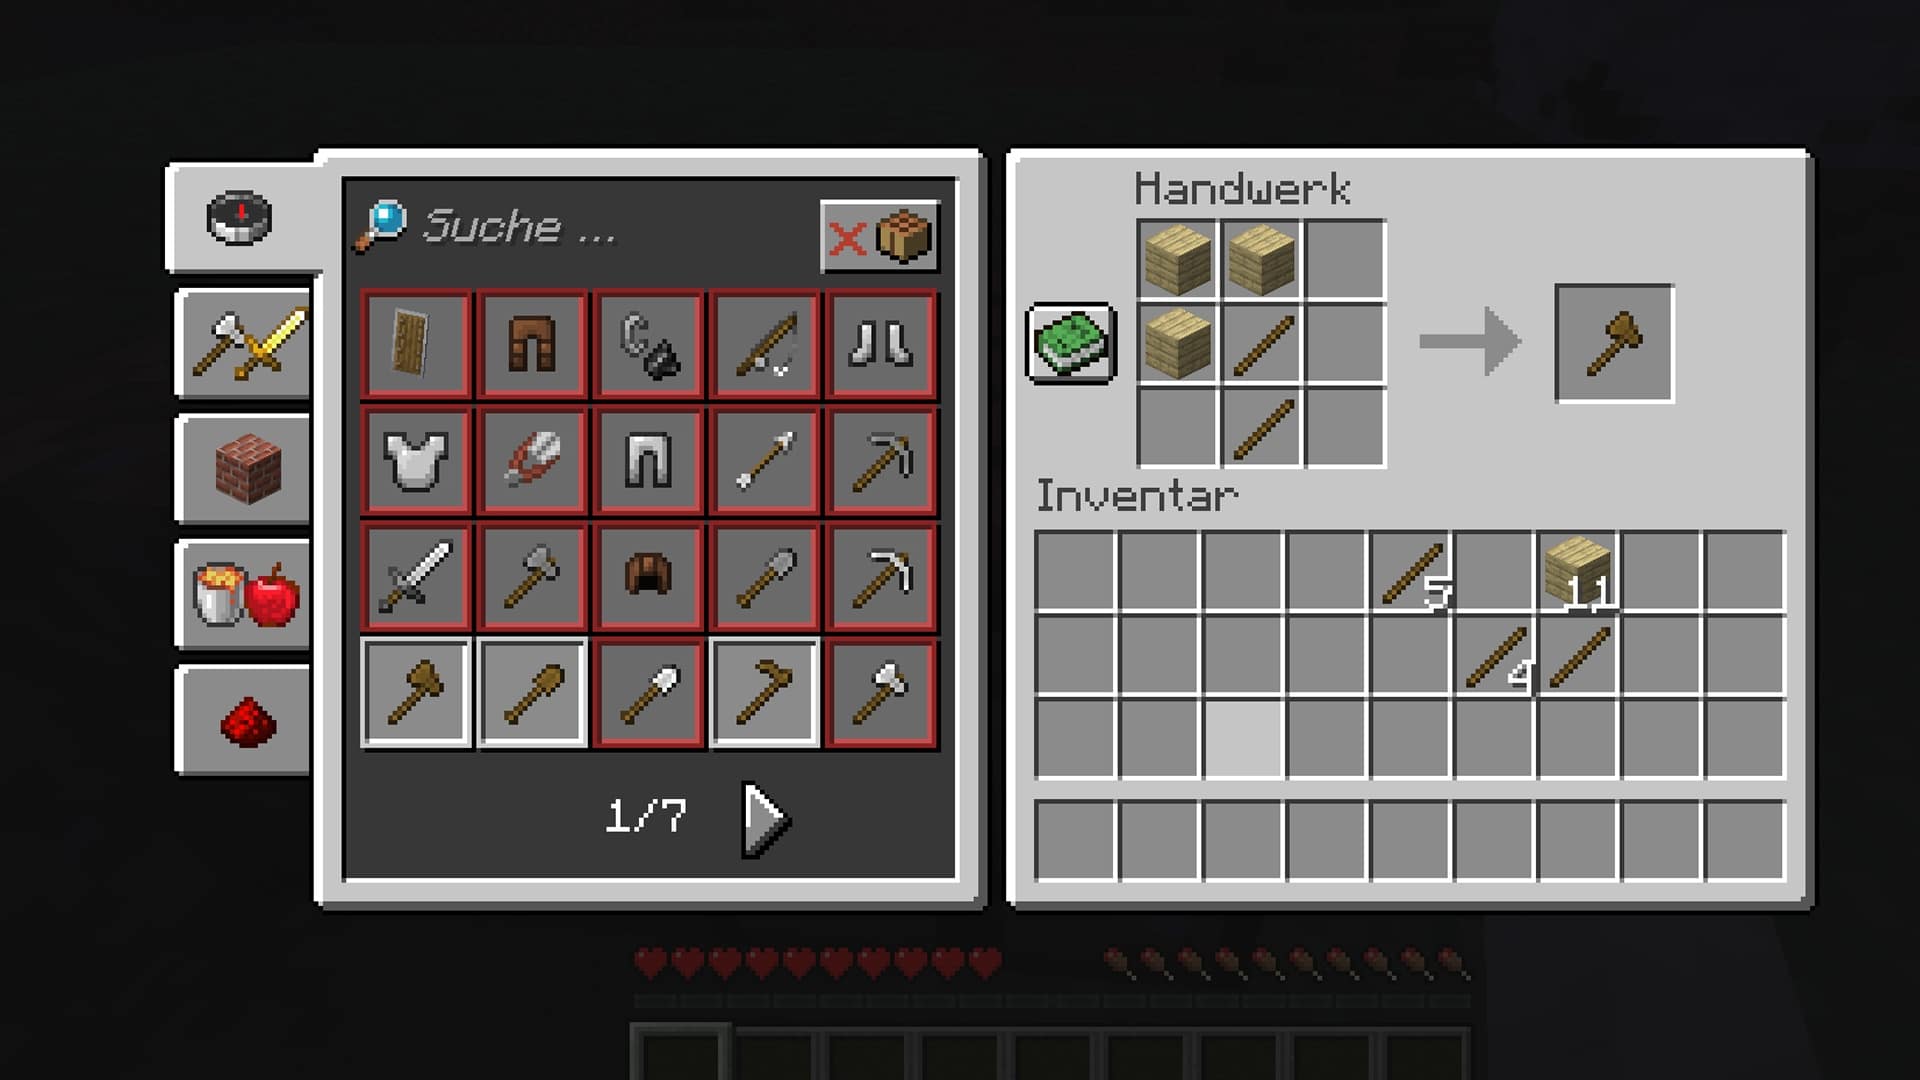
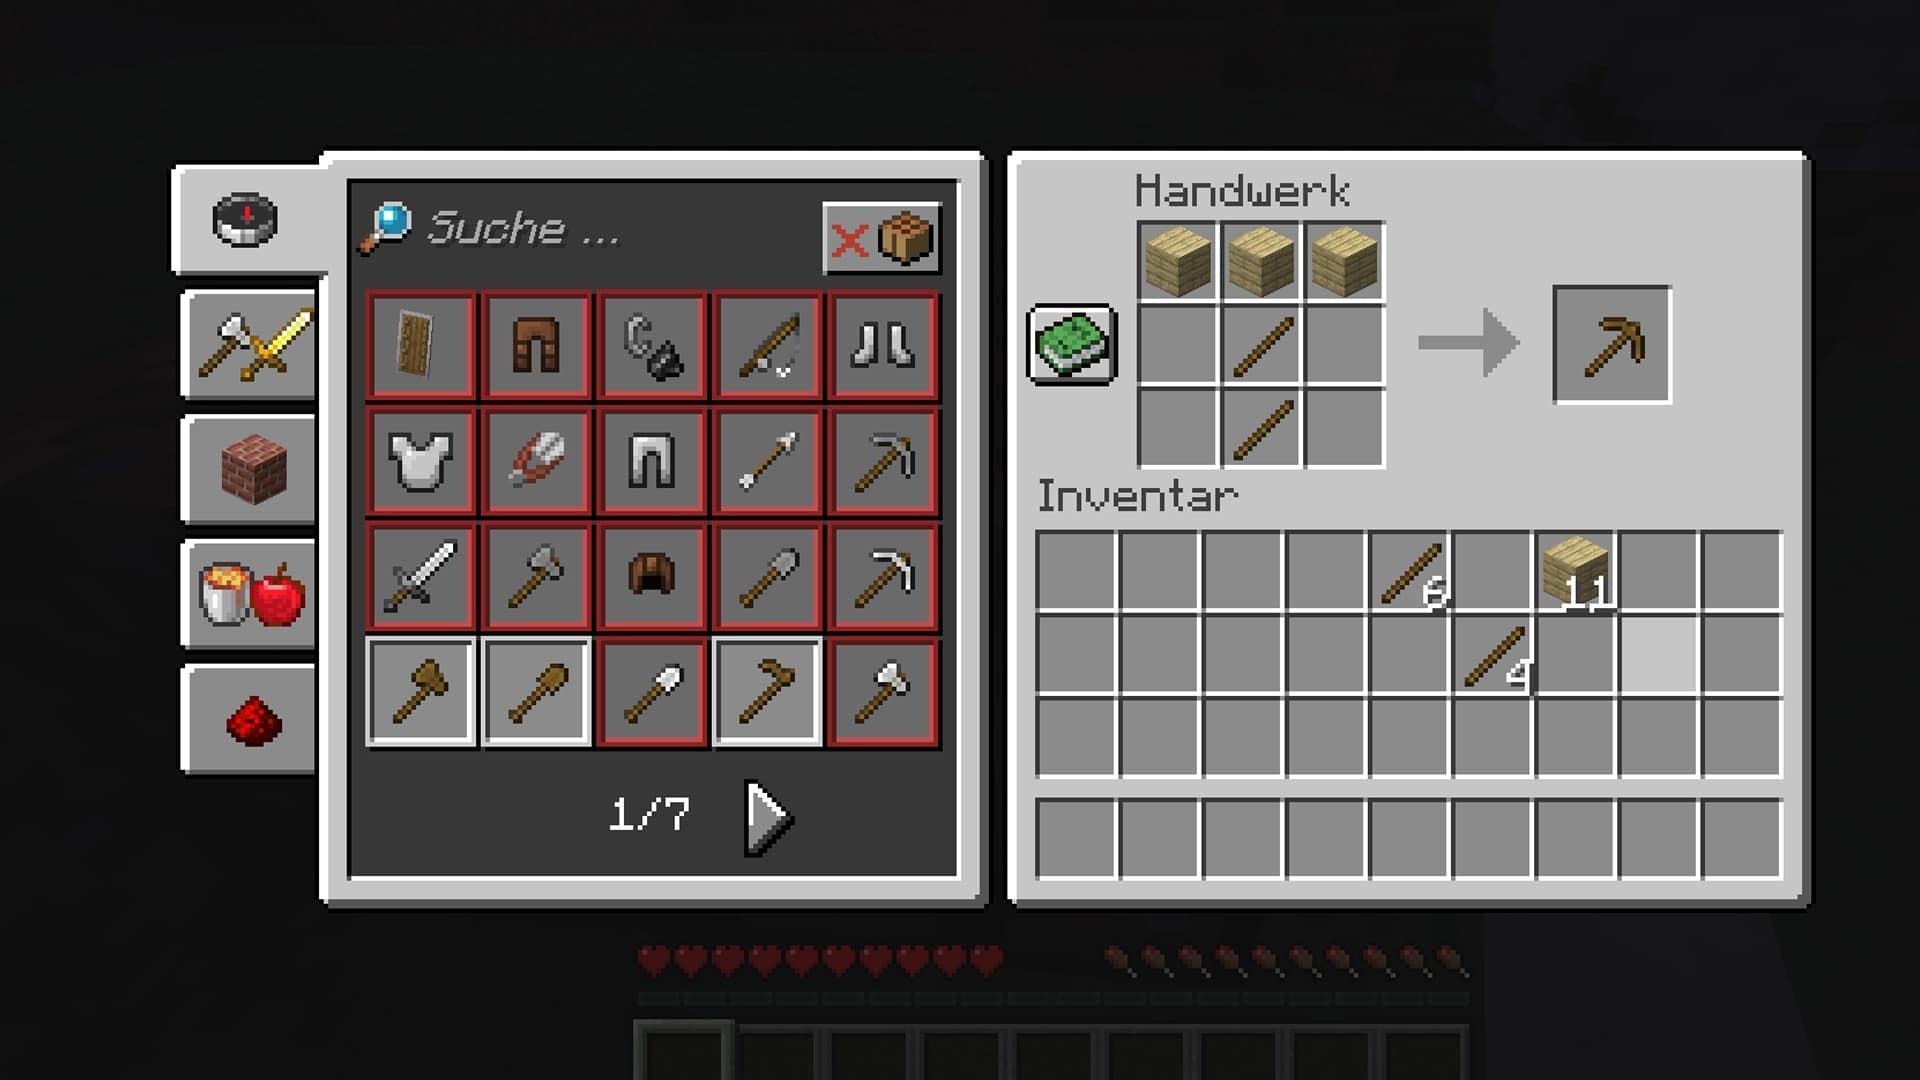
If you want to progress further, you will have to upgrade your tools. But even with stone, iron or diamond you use the same patterns, but you replace the wooden boards with the better material you have available at the moment.
3. Build a shelter
If you play in Minecraft’s Survival mode, you shouldn’t waste too much time and quickly build a shelter for the night. Because at night, the nasty monsters come to the surface. If you are standing freely in the wilderness, you are easy prey for creepers, zombies, skeletons, spiders or crazy wizards.
So quickly build a small hut. Especially in the beginning, wooden blocks are enough. Reminder: You can easily dismantle these with your bare hands.
Build a door: In order to be able to leave your hiding place at any time, it’s a good idea to build in a door. First make boards out of your wood and then combine them as shown in the picture:
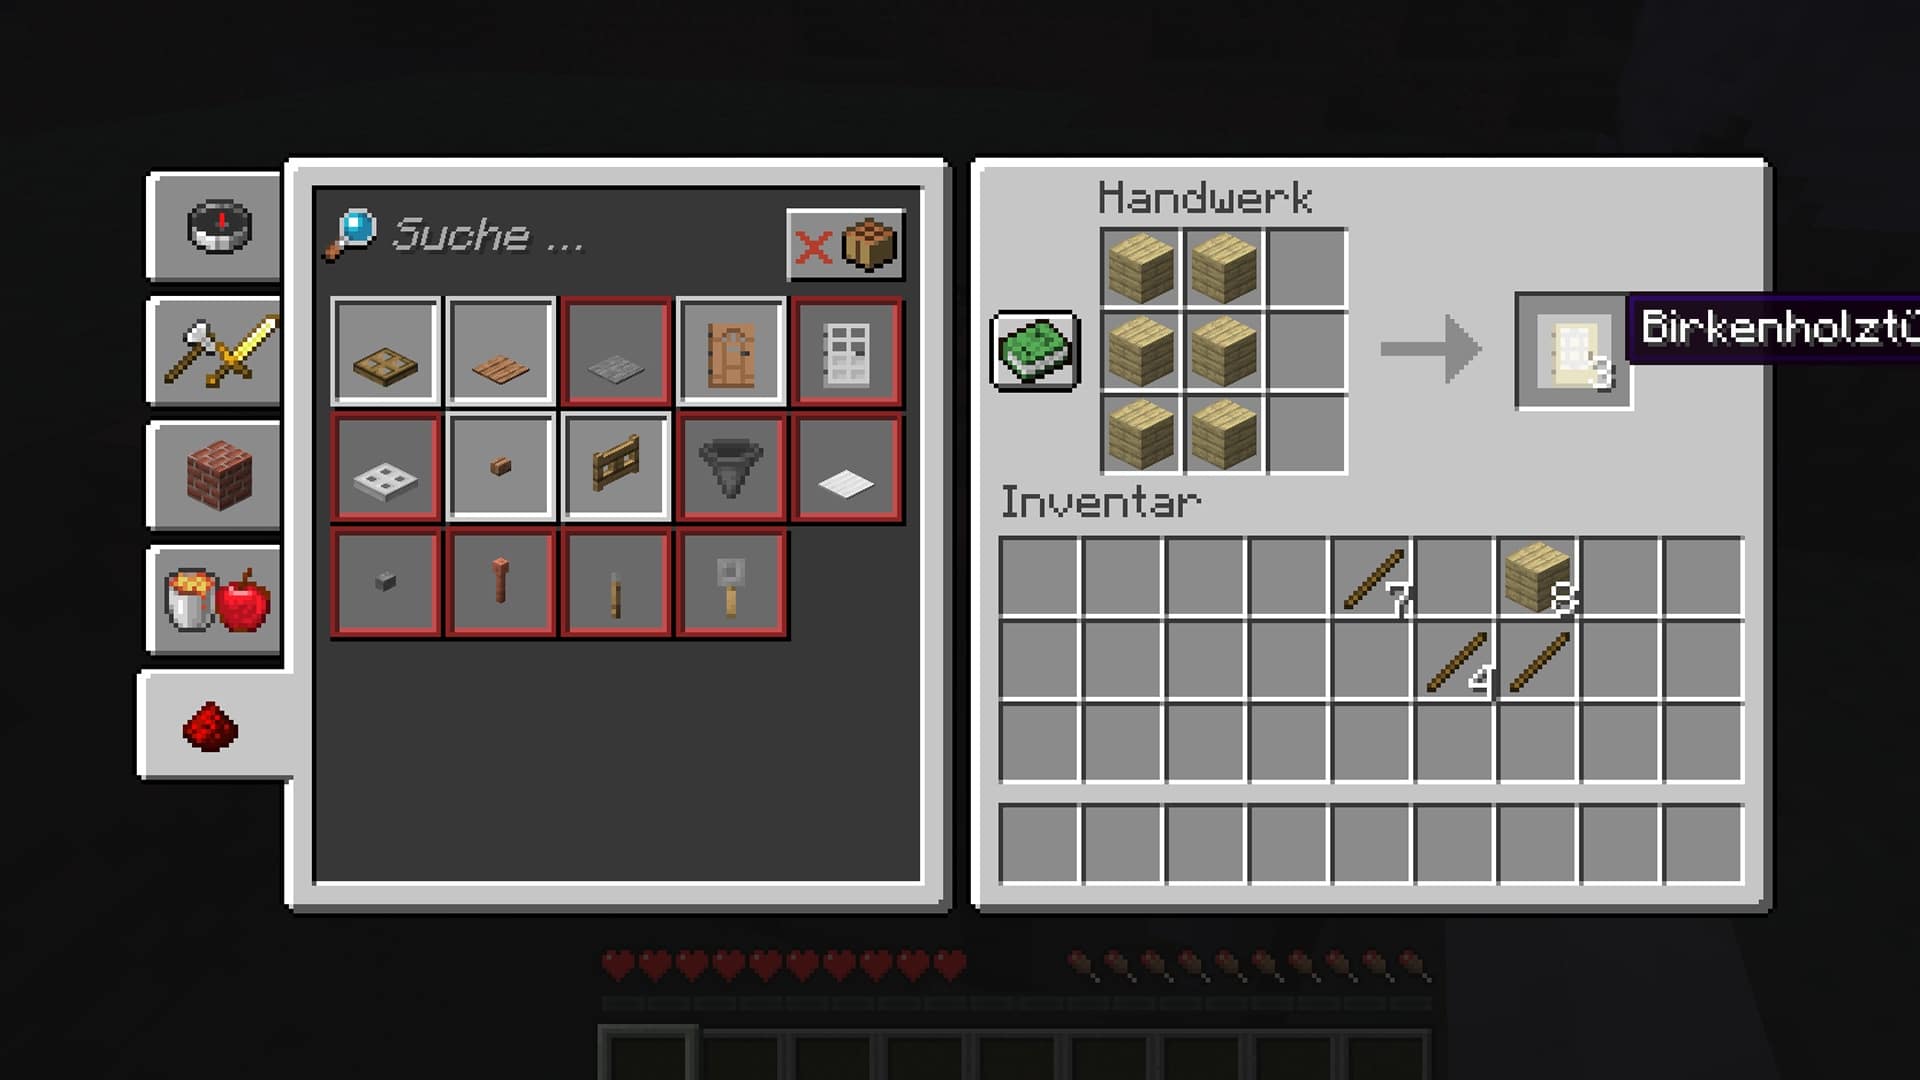
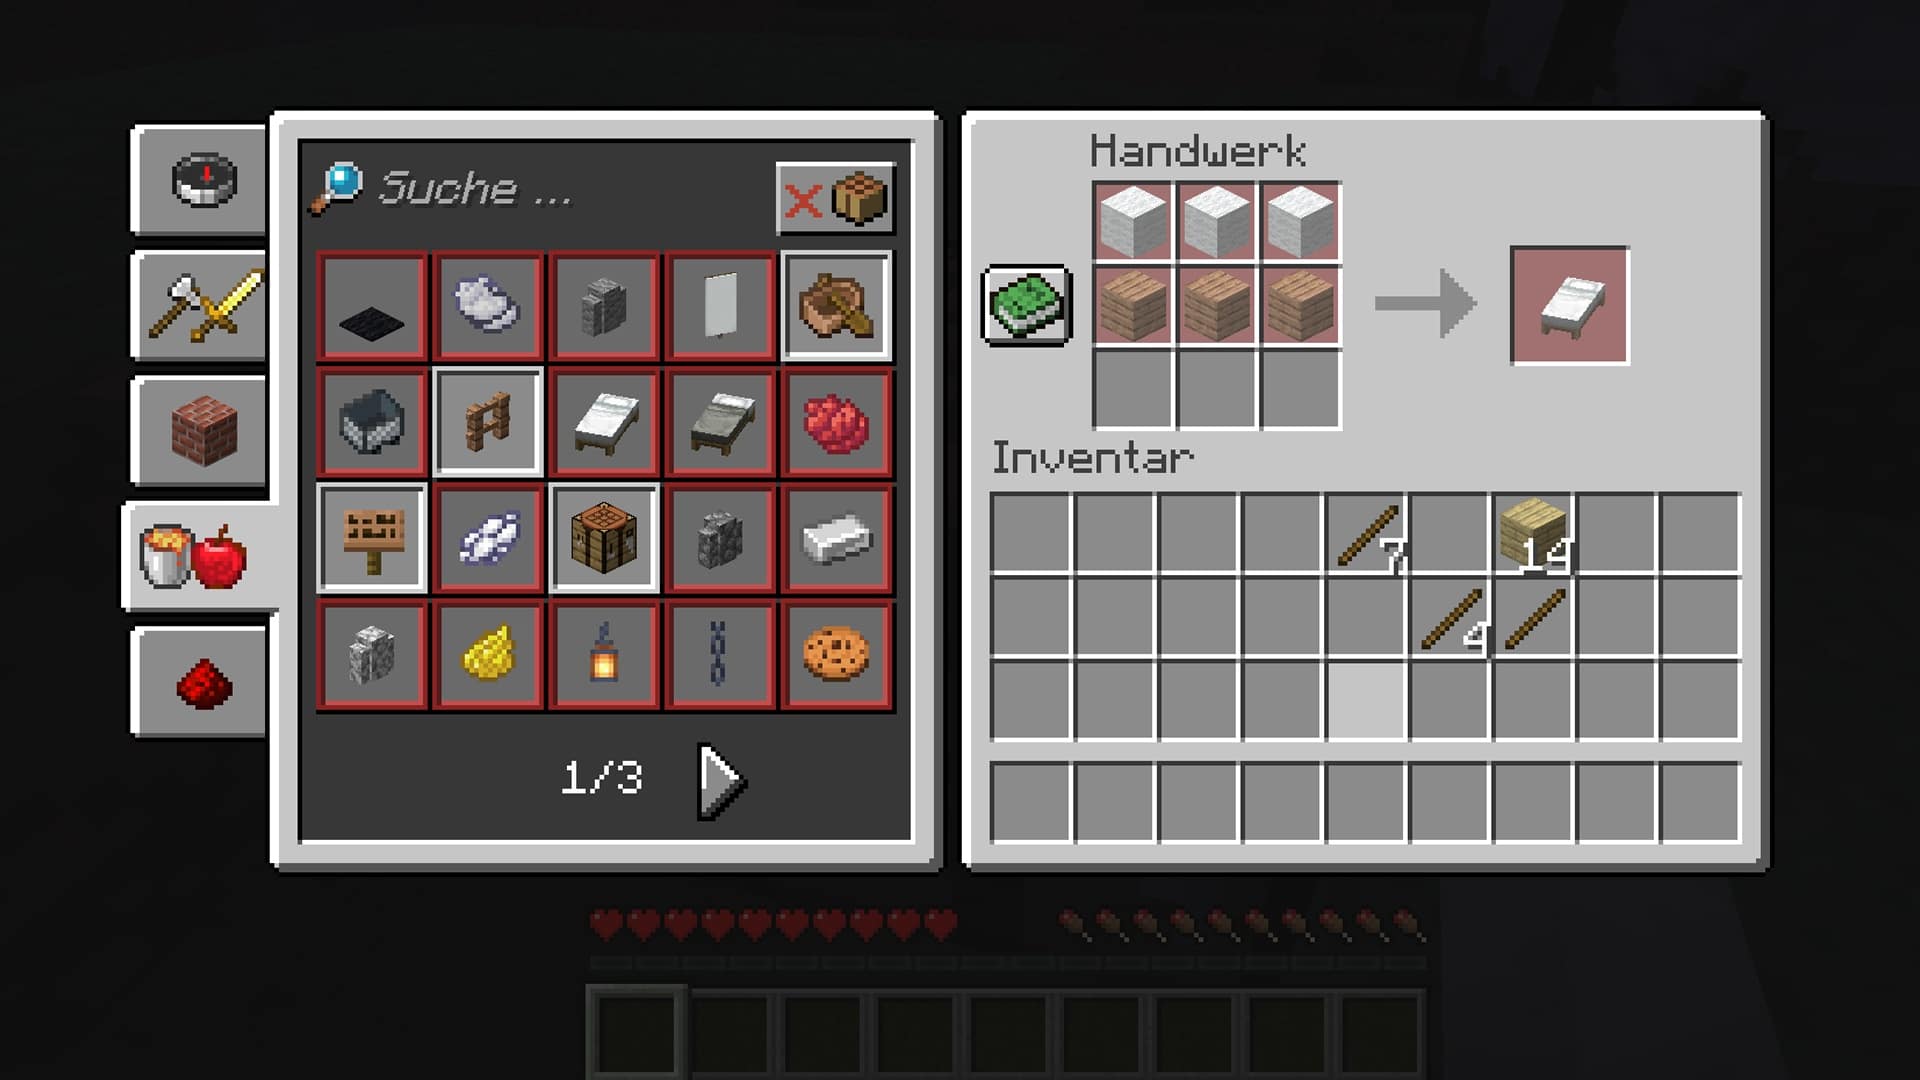
Sleep through the night: The quickest way to get through the night is to sleep through the night. But for that you need a bed. To make a bed, you need wooden boards and three times sheep’s wool of the same colour.
Chances are you have spawned in a biome with lots of sheep running around. As you don’t have scissors to shear sheep at the beginning, you will have to resort to more drastic means. You can kill a sheep with your bare hands and hope that it sheds wool. It’s best not to look them in the cute googly eyes.
By the way, we present the best building tutorials for your own home in this article:
Build in Minecraft: The best tutorials and tips for beautiful houses (GUIDE)
4. stock up on provisions
In Minecraft you should always keep an eye on your hunger. If your feeling of fullness drops to zero, your health will suffer and you can even die. So get your food together as quickly as possible.
You can eat many things in Minecraft: berries, apples, mushrooms, fish, meat and even rotting zombie flesh. However, you should first roast your non-vegan options.
You can either do this at the campfire or build an oven. The latter must be heated with coal. Then just put your raw meat in it and wait until it is done roasting.
If you want to eat something, you just have to put it in your quickbar, select it and munch on it with a left click.

5. Descend into the Underground
Now that you’ve survived the first night and the first hunger attack, and have prepared all the essential tools, it’s time to explore Minecraft’s caves. You can either find them by chance as you roam through the vastness of the world of bricks. Or you can simply dig your way down. Grab your shovel and start digging!
In caves you will find new materials, which you can use to build new items. You will need special tools to mine some resources. While you can mine iron with a stone pickaxe, you’ll need a diamond pickaxe to mine obsidian.
Helpful Mods for Beginners
The Minecraft modding scene is booming. Over the past decade, countless modifications for the block sandbox have emerged. Since Minecraft has hardly changed visually in the last decade, Texture Packs pretty up the pixel look a bit.
Other mods change the gameplay basics and make, for example, the survival harder or the role-playing more complex. We have compiled a separate list of the best mods for Minecraft.
In this guide, however, we want to focus on three mods that can make it easier for beginners to get started with Minecraft.
Journey Map
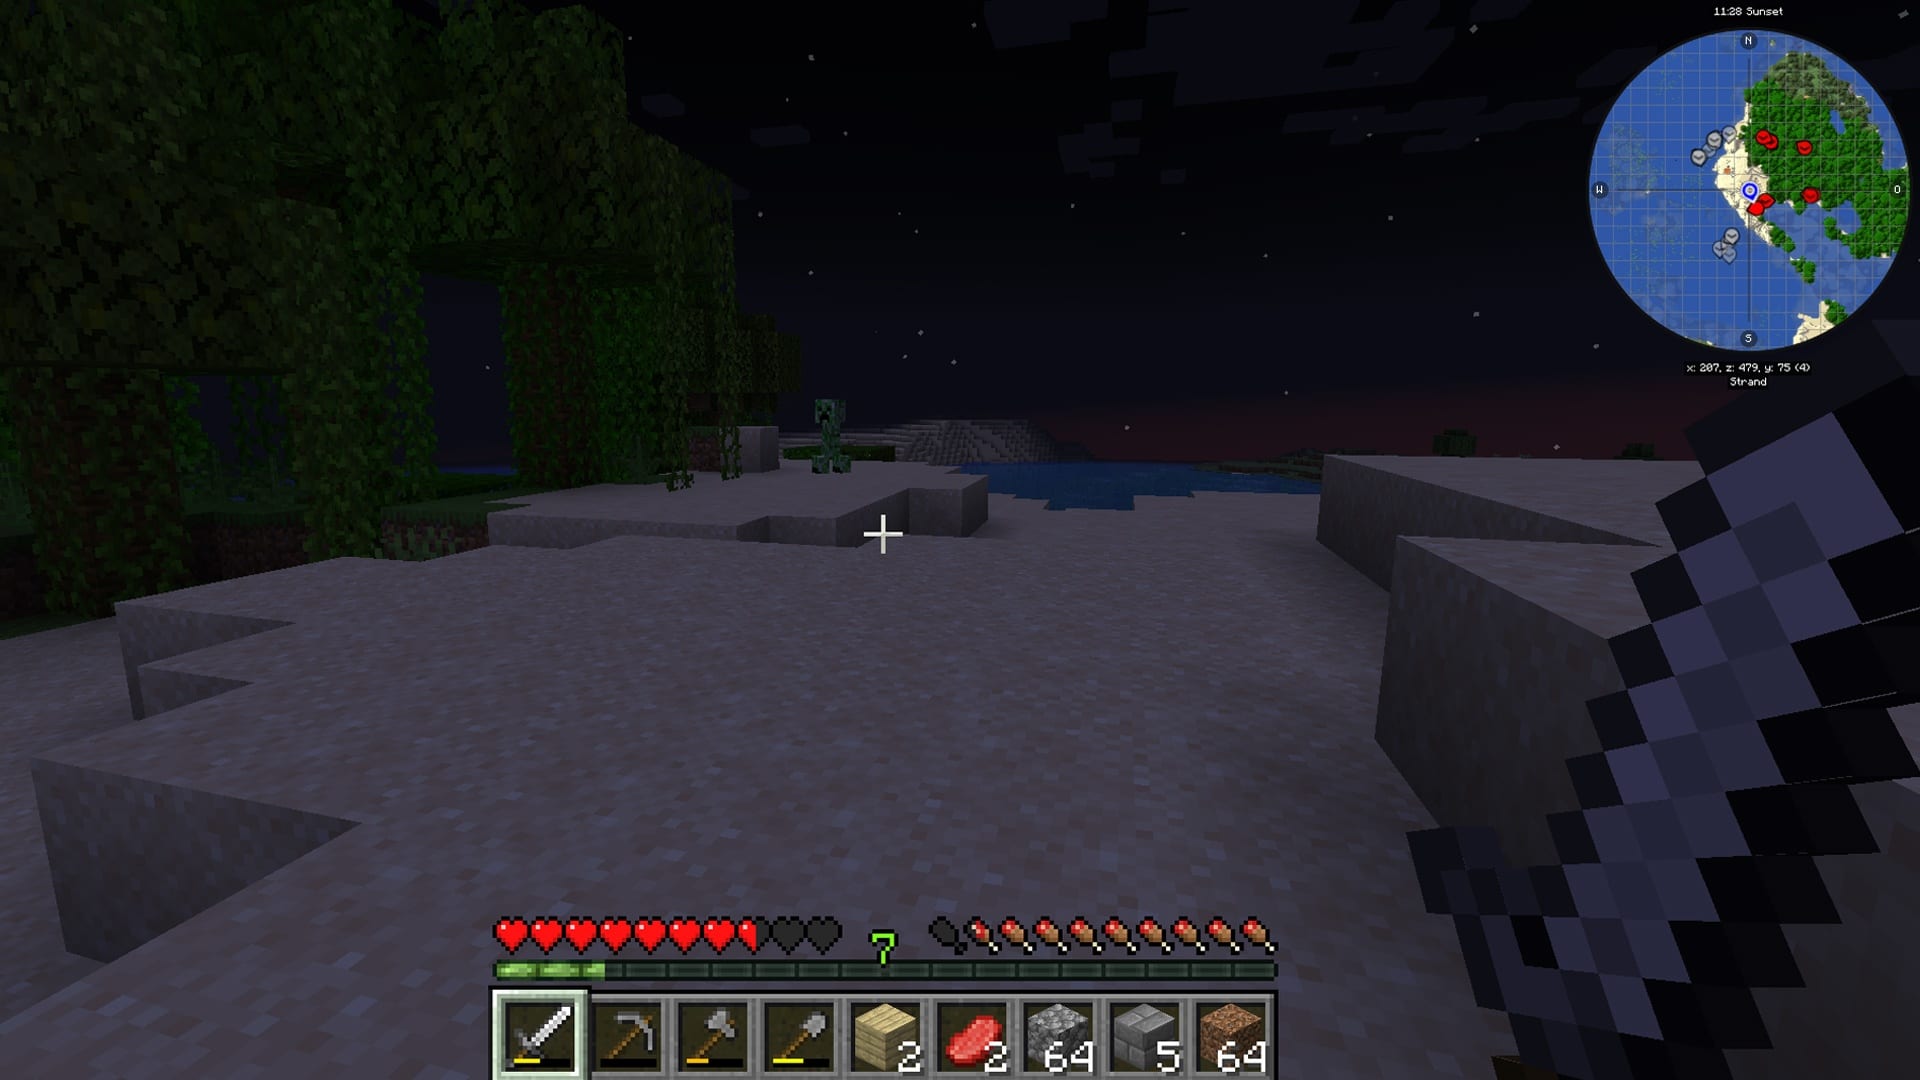
What can the mod do? Do you also constantly get lost in Minecraft because you have the sense of direction of a long outdated navigation system? The mod Journey Map makes your journey through the huge world of Minecraft much easier. It provides you with a practical map.
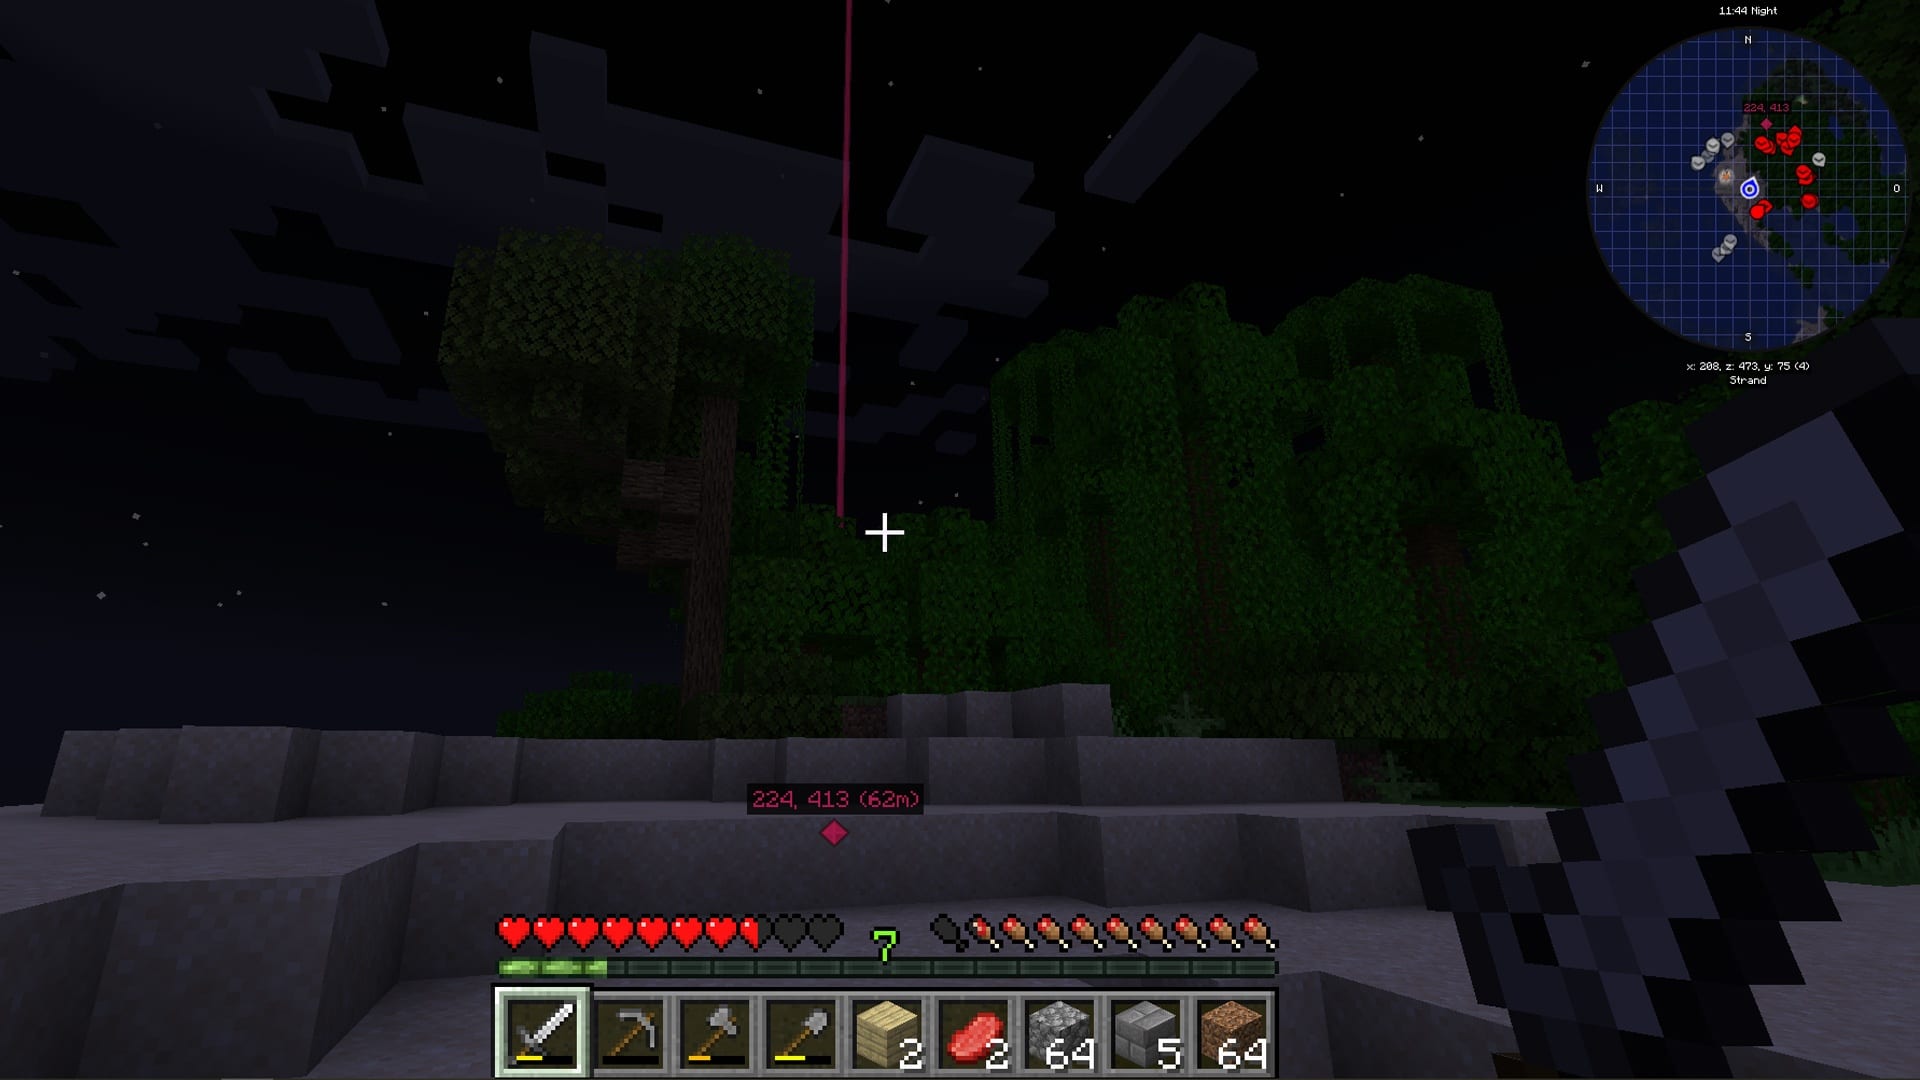
A minimap in the upper right corner always shows you your position and what is around you. Enemies, for example, are marked with red dots, animals with grey dots.
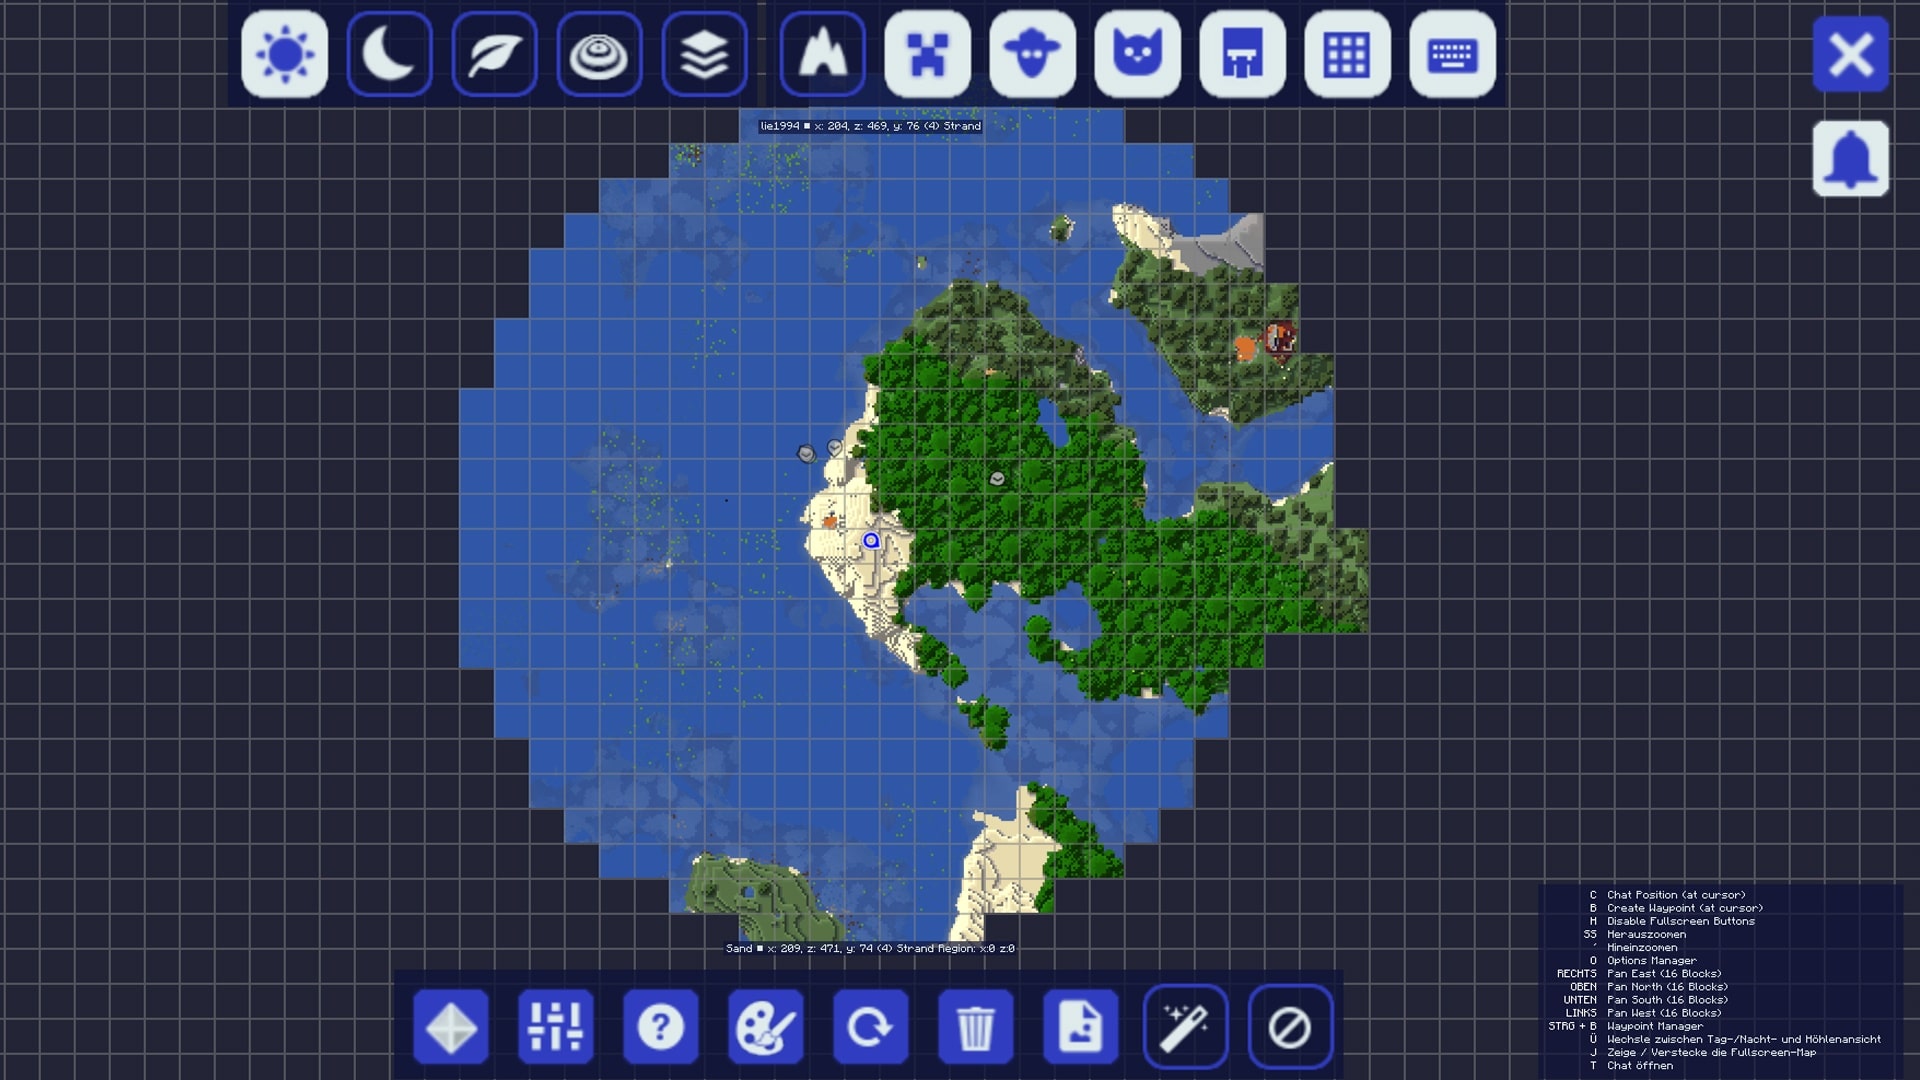
Open the map with the J key. Here you can choose between different display modes such as day or night, biome or topography.
If you want to set a waypoint, you must first click on the map and then press B. Choose a name and a colour for your marker and click on “Save”. The marker will now be displayed on the minimap and in the game world.
How to install the mod:
- For this mod you need the mod manager Forge. How to install it without problems, (read our separate guide)
- Download the Journey Map mod
- Open your Java version in Forge mode now. In the Minecraft Launcher you can choose between the Forge version and the normal version before you start the game;
- Now click on “Mods” in the main menu and then on “Open mods folder”. A folder should now open.
- Place the downloaded files from Journey Map in this folder and click “Done” in the game. Restarts Minecraft in the Forge version.
- That’s it. Enjoy the minimap!
Just Enough Items
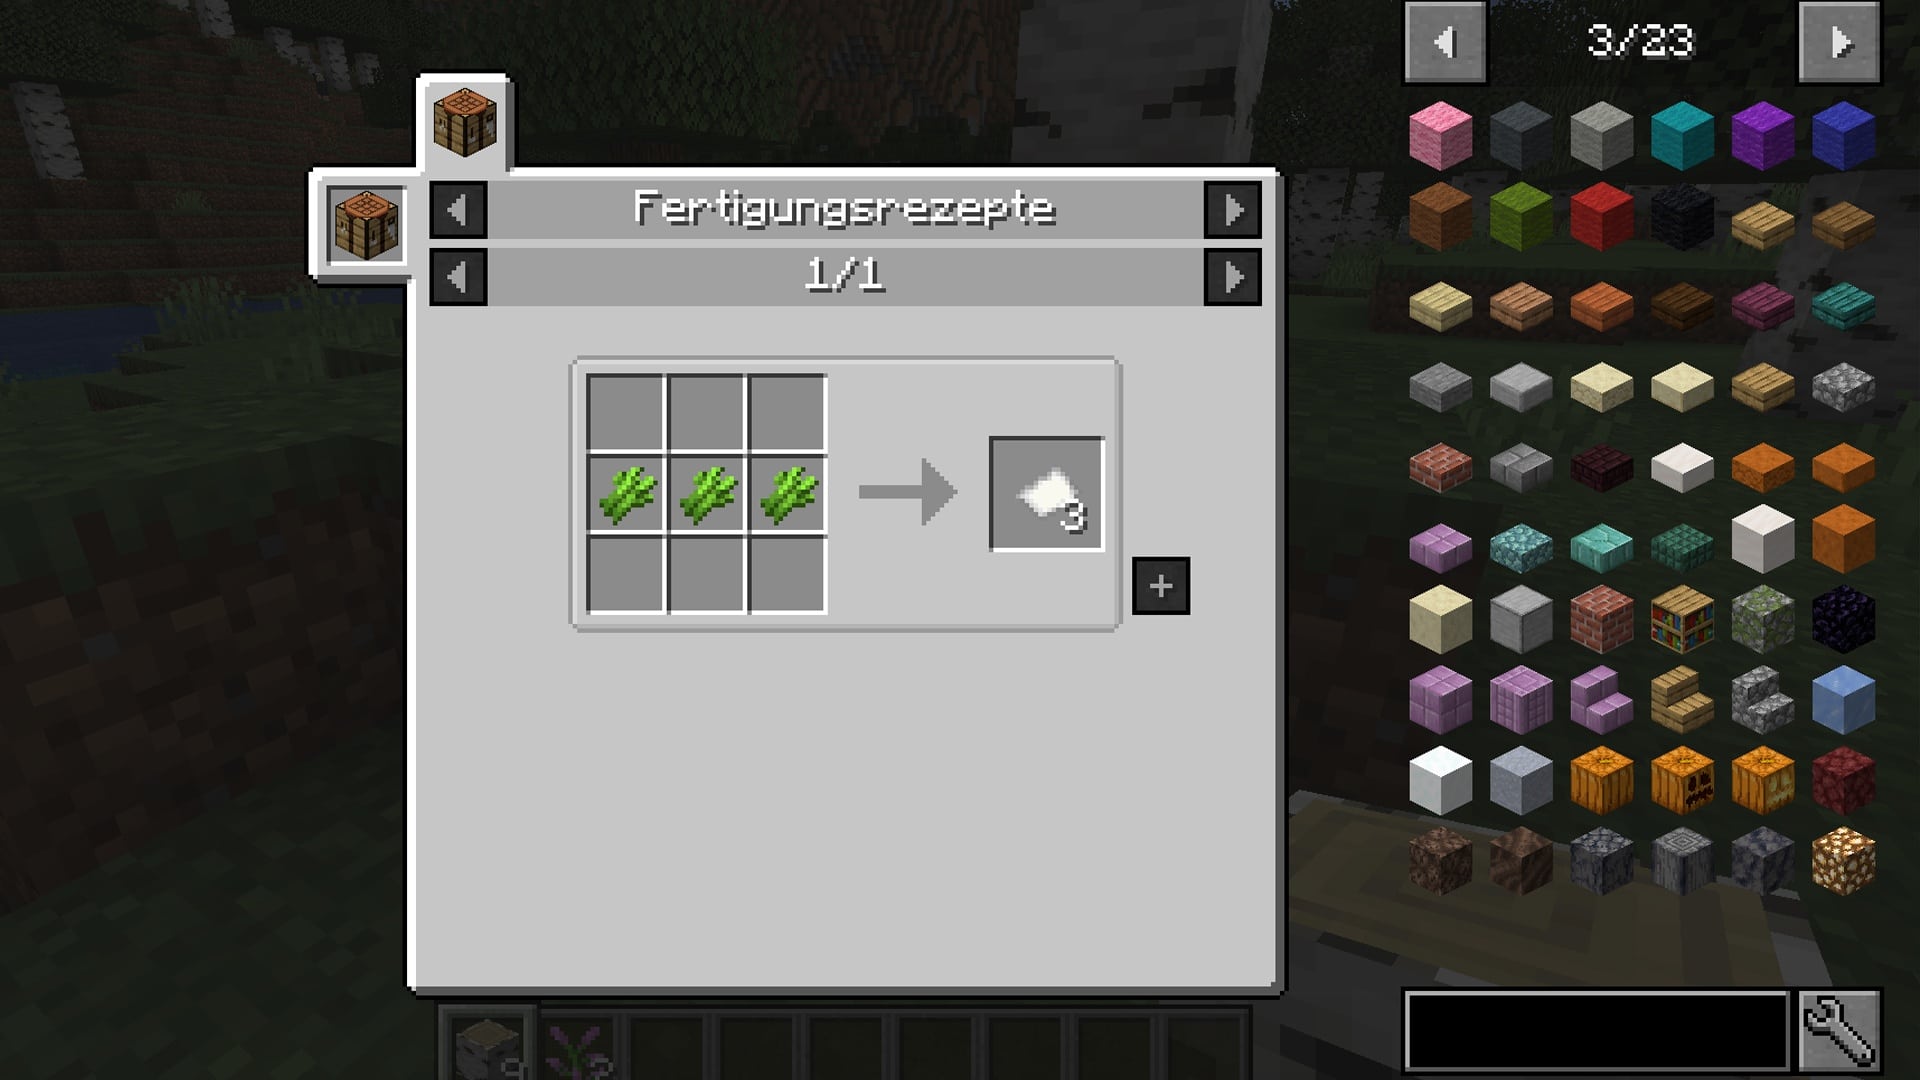
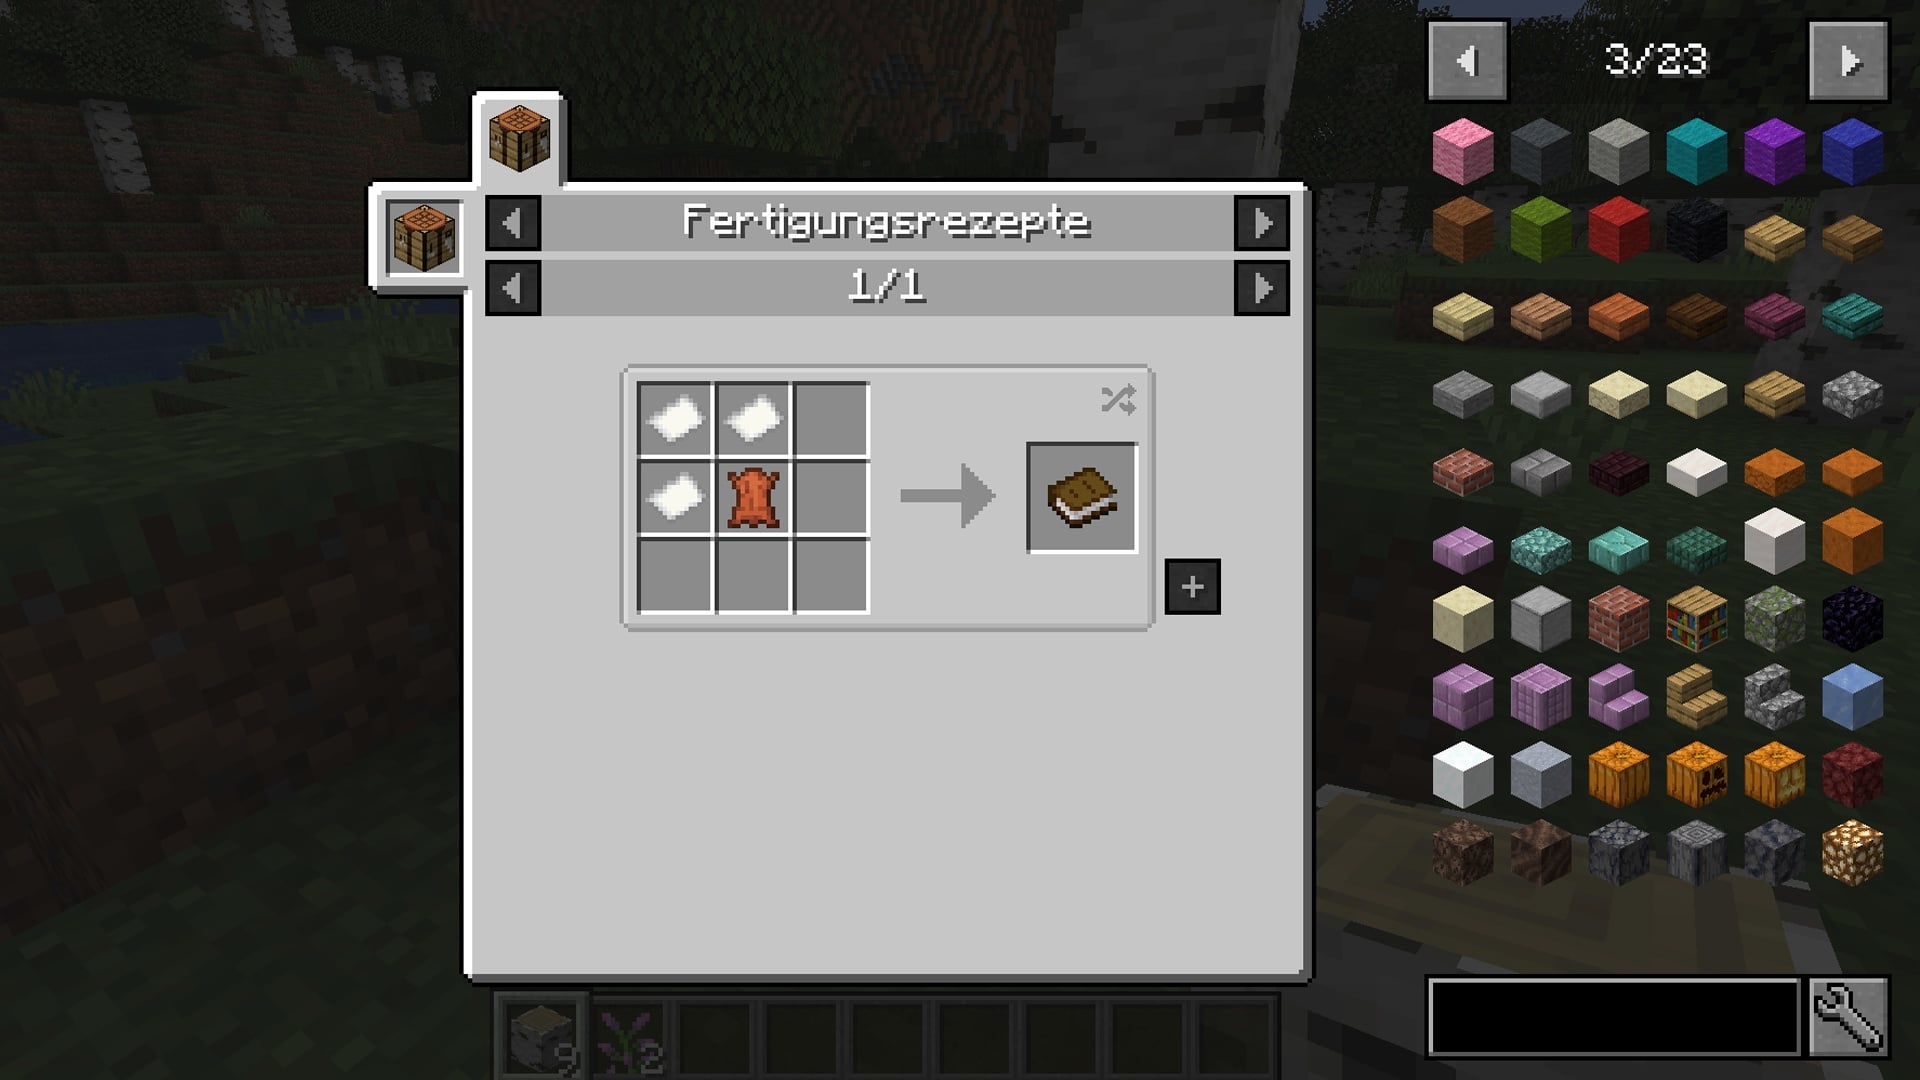
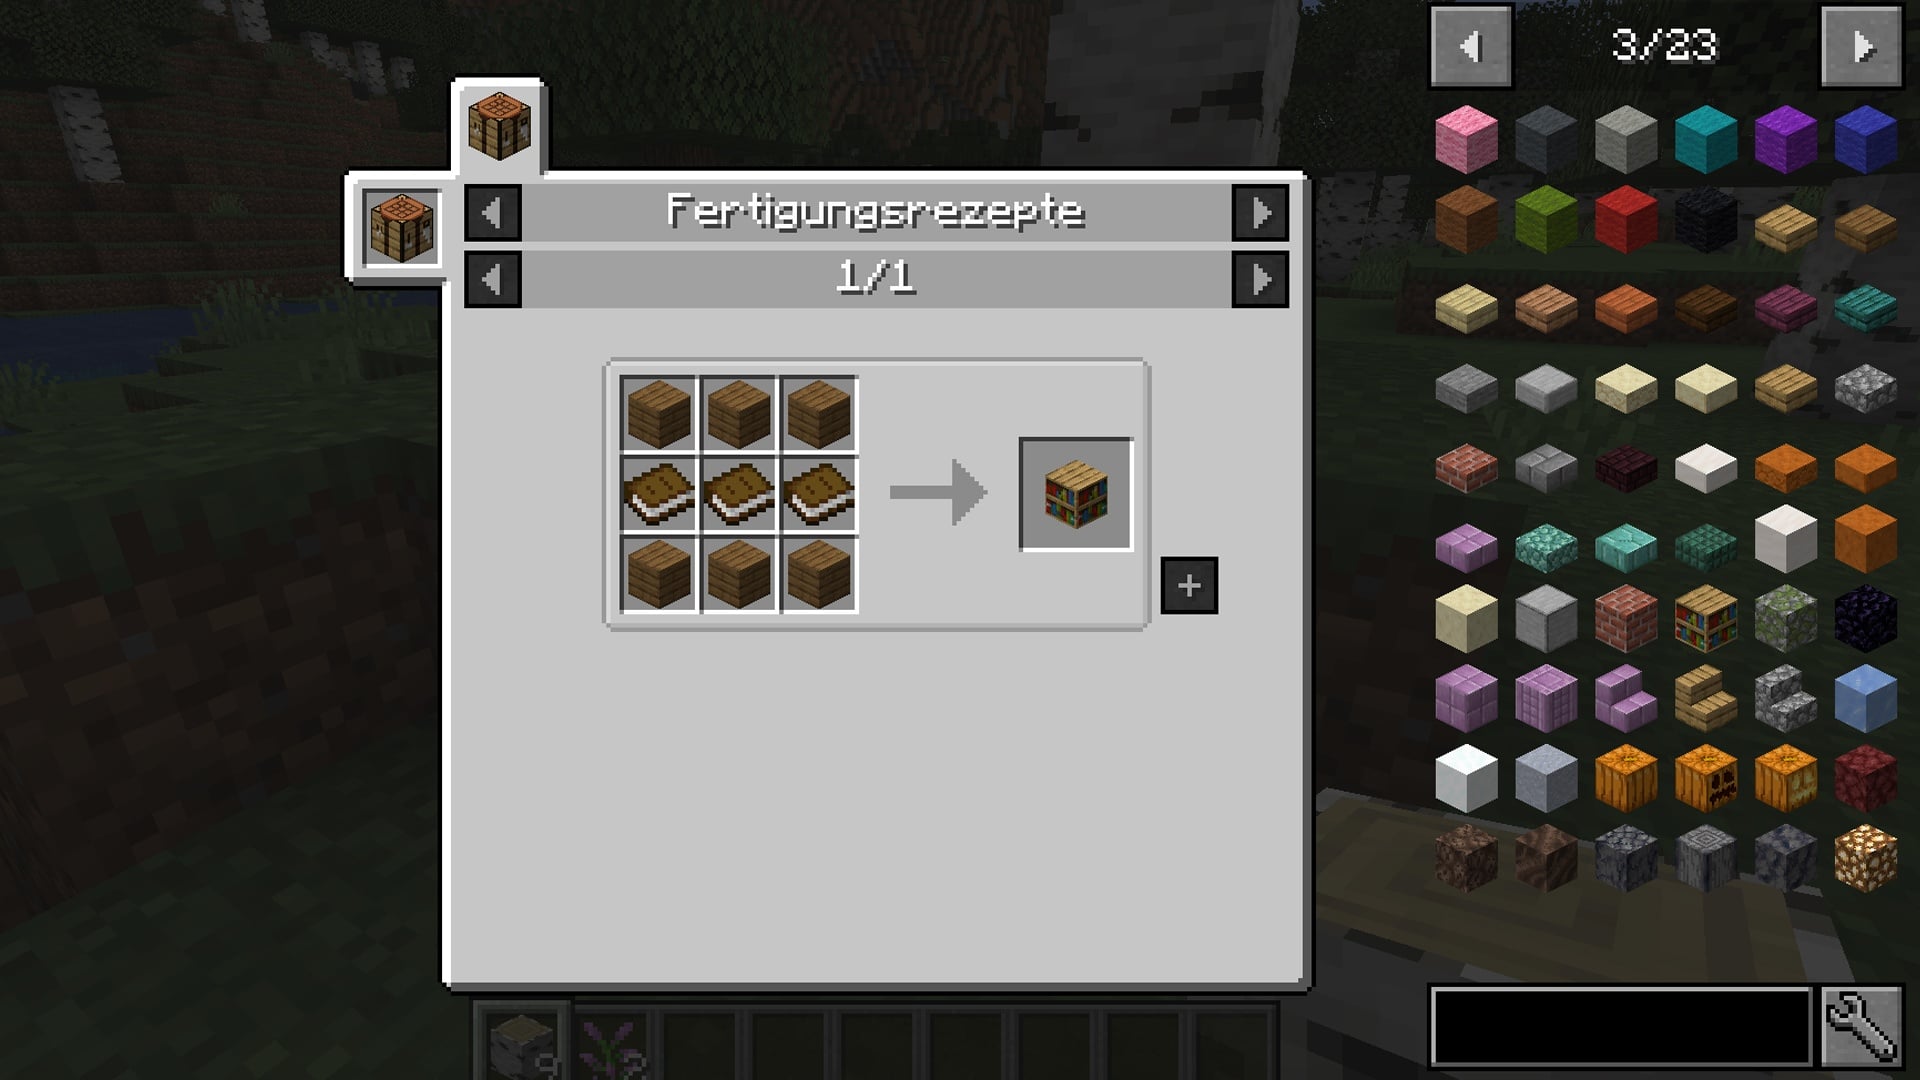
What can the mod do? Especially for beginners, the variety of different recipes can quickly overwhelm. How do I make a bookshelf again? And what do I need for the paper? Just Enough Items helps you directly in the game so that you don’t have to hang out in wikis all the time while playing.
Press the “E” key to open your inventory as usual. Many pages with wonderful recipes will appear on the right. If you are looking for a specific item, you can also enter your search term in the field.
If, for example, you want to know how to make a bookcase, click on it and the recipe will be displayed. If you don’t remember how to make the books you need for the recipe, simply click on the book and the next production process will be explained to you. By the way, you can return to your inventory by clicking on “E” again.
How to install the mod:
- For this mod you need the mod manager Forge. How to install it without problems, (read our separate guide)
- (Download the latest version of the Jade Mod.)
- Now open your Java version in Forge mode. In the Minecraft Launcher, you can choose between the Forge version and the normal version before you start the game.
- Now click on “Mods” in the main menu and then on “Open mods folder”. A folder should now open.
- Place the downloaded files from Journey Map in this folder and click “Done” in the game. Restarts Minecraft in the Forge version.
Jade
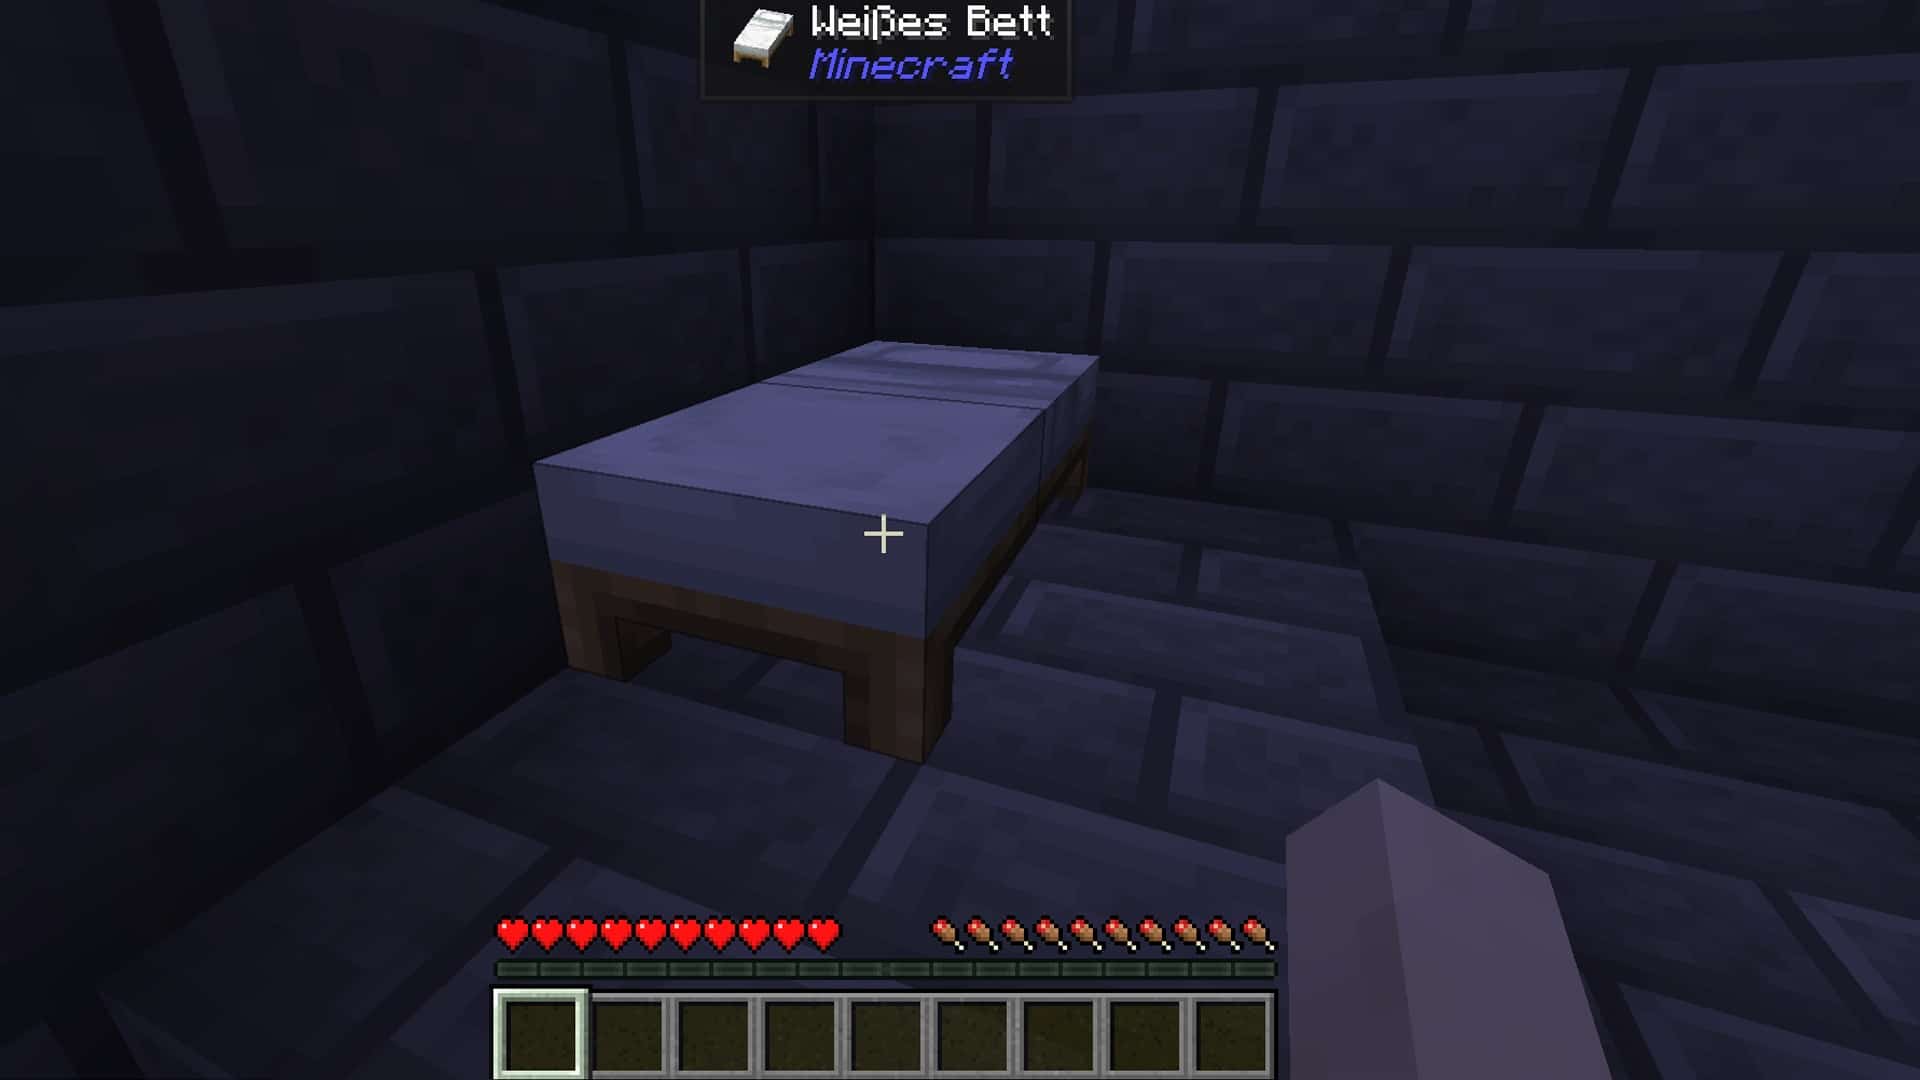
What can the mod do? It doesn’t matter if you are new to Minecraft or if you have simply slapped a lot of graphic textures onto your bricks: At some point you ask yourself the question “What is this now anyway?”. The Minecraft mod Jade provides you with the answer.
This mod activates an overlay that shows you at any time which block or item you are looking at. Is it sand? Is it a white bed? The mod tells you!
Also practical: If you look at a crate, for example, it will show you directly what is inside and you don’t have to open it additionally. This way you can also see how much coal and broken stone is still in the oven and how long it will take to get to the next stone.
You can switch the overlay off and on again at any time with the Num 1 key. By the way, you can open the mod settings for Jade with Num 0.
How to install the mod:
For this mod you need the mod manager Forge. You can read how to install it without any problems in our separate guide. (Download the latest version of the Jade mod.) Now open your Java version in Forge mode. In the Minecraft Launcher, you can choose between the Forge version and the normal version before you start the game. Now click on “Mods” in the main menu and then on “Open Mods Folder”. Now a folder should open. Place the downloaded files of Journey Map in this folder and click on “Done” in the game. Restart Minecraft in the Forge version
Of course, we still have a lot of special guides for Minecraft ready for you. For example, how to play multiplayer, how to make your own skins or how to build a really fancy mansion:
With these tips, you’ll have the perfect foundation to get you started in Minecraft. Gather resources, explore the world, try new recipes, build out your house and let your creativity run wild. If you have any other important tips for Minecraft beginners, please let us know in the comments!
