

There are some cool mods for Cyberpunk 2077 that make your gaming experience more varied or run smoother on the screen. Find out which ones they are in our overview.
Cyberpunk 2077 has been available for quite some time and accordingly, there are now many mods for the role-playing colossus. But which of them are really good and how do you get them to work? We’ll explain that to you in this overview.
For this purpose, we have searched through popular sources such as (Nexus Mods) and, in the case of graphics mods, we have also made comparison pictures so that you can see at first glance whether the effort is worth it for you. An important piece of information about compatibility: We have tested all mods with game version 1.31.
Before you start: Some of the mods we have presented require additional mods as a technical foundation for everything to work smoothly: The Cyber Engine Tweaks and Native Settings UI. You install these as follows:
- Cyber Engine Tweaks: Download the current version as a ZIP file and unpack it in a location of your choice. Now move the resulting bin folder into your installation directory, which can be reached by default via the path C:\Programmes (x86)\Steam\steamapps\common\Cyberpunk 2077 (Steam version) or C:\Programmes (x86)\GOG Galaxy\Games\Cyberpunk 2077(GOG version). Then start the game and a window will appear asking you to set a hotkey for calling the mod menu in the game.
- Native Settings UI: Download the mod and move the contents of the archive to your installation directory. An already installed version of the Cyber Engine Tweaks is required, so you should follow the order
And what about the graphics mods? Here, too, you may have to do some preliminary work. Most of the graphics mods we present are simple colour and brightness profiles for the popular tool ReShade. Here, too, we will help you with the installation:
* Download the (current ReShade version) and start the tool. You should then select the EXE file of the desired game. In the Explorer window, navigate to your Cyberpunk 2077 installation directory and select the file Cyberpunk2077.exe in the bin folder. Confirm your choice and you will be asked if you would like to download a selection of preset effects – which is not necessary for the Cyberpunk mods. Start the game and press the POS1 key on your keyboard (above the numeric keypad). In the menu that appears, you can set ReShade according to your wishes and set a hotkey for activating or deactivating it.
Table of Contents
All mods in the overview
Gameplay
- Live in Night City – Survival elements for your character
- Cyberdrive – Better control while driving
- Better Minimap – See more with zoom!
- JB Third-Person-Mod – The Witcher-Feeling in Night City
- Instant Disassembling and Crafting – No more waiting while crafting
- Metro System – Functional trains throughout the city
- Vehicle Customizer – More variety in the garage
- GTA Travel – A pinch of GTA 5 thanks to new loading screen
- Sneak – Off into the shadows thanks to effective sneaking
- Flib’s UI Improvements – More comfort and clarity in the menus
- Styling Mods for V – The right outfit for every occasion
Graphics & Performance
- Darker Lighting
- Simple Realistic
- Autonomous ReShade – True HDR
- Borderlandfy2077
- Alternative Character Lighting
- Optimized Raytracing
- Config Overhaul
Gameplay Mods for Cyberpunk 2077

Live in Night City
Is your inventory already filled to the brim with drinks and food because you simply don’t need them? Then the mod (Live in Night) City is just the thing for you, because it brings real survival elements into the game. If you forget to eat or sleep, you can expect physical restrictions and even total exhaustion. Sounds exciting? Then definitely try it out!
How to install the mod: Download the mod and unpack the archive into the respective game directory, which you will find by default under the following path:
- Steam: C:\Program Files (x86)\Steam\steamapps\common\Cyberpunk 2077
- GOG: C:\Program Files (x86)\GOG Galaxy\Games\Cyberpunk 2077
For this mod you need the Cyber Engine Tweaks as technical base. You can find installation instructions and a download link in our technology box at the beginning of the article.
Cyberdrive
Are you also constantly at war with the sometimes inaccurate driving behaviour of the cars in Night City? Then the mod Cyberdrive is definitely worth a look. With it, the vehicles behave more realistically and thus more predictably, especially in curves.
How to install the mod: Download the mod and unpack the archive in the respective game directory, which you will find by default under the following path:
- Steam: C:\Program Files (x86)\Steam\steamapps\common\Cyberpunk 2077
- GOG: C:\Program Files (x86)\GOG Galaxy\Games\Cyberpunk 2077
If Windows asks you if you want to overwrite the vehiclehandling.ini file, confirm with Yes. Remember to save the original file first so that you can quickly and easily undo the changes made by the mod if you are not convinced by them.
Better Minimap
The minimap in Cyberpunk is not everyone’s cup of tea: Some find it too small, the zoom doesn’t fit, or it is simply too clumsy and should rather be transparent. The remedy for this is the (Mod Better Minimap).
How to install the mod: You can install the mod via an installer with a simple mouse click, but you will need the additional programme CP77Tools (download here). Alternatively, you can manually download your (preferred setting) and copy it into your installation directory, which you will find by default under the following path:
- Steam: C:\Programmes (x86)\Steam\teamapps\common\Cyberpunk 2077
- GOG: C:\Program Files (x86)\GOG Galaxy\Games\Cyberpunk 2077
JB Third-Person-Mod
Cyberpunk 2077 is played from a first-person view by default, which still bothers many fans who were hoping for a perspective like in The Witcher 3. The (JB – Third Person Mod) wants to bring up this gameplay feeling from The Witcher 3 by showing V from the third-person camera. Keep in mind, however, that the world designers created Night City specifically with the first-person perspective in mind, so every now and then some of the scale might seem out of place.
How to install the mod: Download the mod and unpack the archive into the respective game directory, which you will find by default under the following path:
- Steam: C:\Program Files (x86)\Steam\steamapps\common\Cyberpunk 2077
- GOG: C:\Program Files (x86)\GOG Galaxy\Games\Cyberpunk 2077
For this mod you need the Cyber Engine Tweaks as technical base. You can find installation instructions and a download link in our technology box at the beginning of the article.
Instant Disassembling and Crafting
Are your nerves also strained every time you have to wait precious seconds before the process is finished when crafting and disassembling weapons, armour and other items. Then the mod (Instant Disassembling and Crafting) might win your heart, as it allows you to perform these crafting activities without waiting.
How to install the mod: Download the mod and unpack the archive. Now copy the file inputContexts.xml contained in it into the following folder:
- Steam: C:\Programmes (x86)\Steam\teamapps\common\Cyberpunk 2077\r6\config
- GOG: C:\Programs (x86)\GOG Galaxy\Games\Cyberpunk 2077\r6\config
Be sure to back up the original file so that you can quickly and easily undo any changes you make to the mod if you don’t like it.
Metro System
Who doesn’t know it, the legendary monorail, which should actually jet through the whole of Night City and also be a comfortable travel tool for you. But this feature also fell victim to the scissors and had to be reactivated by fans. The mod (Metro System) lets you explore the city with a fully functional train.
Vehicle Customizer
As you progress through the game, you come into possession of a whole range of cars and motorbikes. But while in GTA 5 you can tune and customise your cars to your heart’s content, in Cyberpunk 2077 you have to live with what you’re presented with – until now. The mod (Vehicle Customizer) doesn’t give you any performance tuning, but it does let you choose a skin for each vehicle. This adds more colour and variety to your garage.
How to install the mod: Download the mod and unpack the archive in the respective game directory, which you will find by default under the following path:
- Steam: C:\Program Files (x86)\Steam\steamapps\common\Cyberpunk 2077\bin
- GOG: C:\Program Files (x86)\GOG Galaxy\Games\Cyberpunk 2077\bin
For this mod you need the Cyber Engine Tweaks as a technical base. You can find installation instructions and a download link in our technology box at the beginning of the article.
GTA Travel
One of the coolest design gimmicks in GTA 5 is to disguise the loading process with a zoomed-out satellite view of the game world when you switch protagonists. In Cyberpunk 2077 you can now experience the same effect, thanks to the mod (GTA Travel). The seamless transition looks especially cool when the camera zooms back to the ground and you return to V’s body. Keep in mind, however, that there may be a few brief frame errors, especially when flying through skyscrapers.
How to install the mod: Download the mod and unpack the archive in the respective game directory, which you will find by default under the following path:
- Steam: C:\Program Files (x86)\Steam\steamapps\common\Cyberpunk 2077
- GOG: C:\Program Files (x86)\GOG Galaxy\Games\Cyberpunk 2077
For this mod you need the Cyber Engine Tweaks as technical base. You can find installation instructions and a download link in our technology box at the beginning of the article.
Sneak
If you don’t want to hit the enemies head-on in Night City, you can also sneak through the city. However, this can be either too hard or too easy in some places, the balancing is inconsistent here. The mod (Sneak) helps you to adjust the stealth gameplay to your preferences. You can make stealth either more difficult or easier, just as you like it.
Flib’s UI Improvements
As stylish as the menus of Cyberpunk 2077 may look, a few convenience features are still sorely missed. These are provided by the mod (Flib’s UI Improvements). Above all, the simple sorting of quests, messages and shards will make your life easier. However, keep in mind that especially such mods could become unusable with a future patch, as CD Projekt Red will surely also fine-tune the interface.
This is how you install the mod: First of all, you have to download the small mod (Redscript) as a technical foundation and copy it into your Cyberpunk 2077 game directory, which you will find by default under the following path:
- Steam: C:\Programmes (x86)\Steam\steamapps\common\Cyberpunk 2077
- GOG: C:\Program Files (x86)\GOG Galaxy\Games\Cyberpunk 2077
Repeat the same procedure with Flib’s UI Improvements – download the mod and unpack the contents of the ZIP archive into the game directory. The mod will then be recognised automatically when you start the game.
Styling mods for V
Hunt down villains, race through the futuristic city in a sporty speedster, meet bizarre personalities – there are many activities you can pursue in Cyberpunk 2077. Despite the third-person view, it is somehow good to know that you have the right outfit for every occasion.
Graphic mods
Darker Lighting
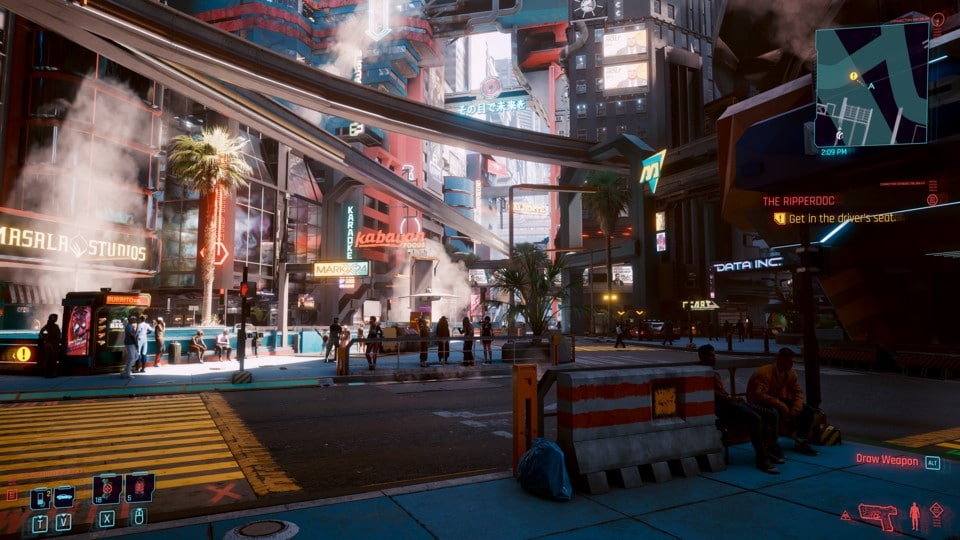
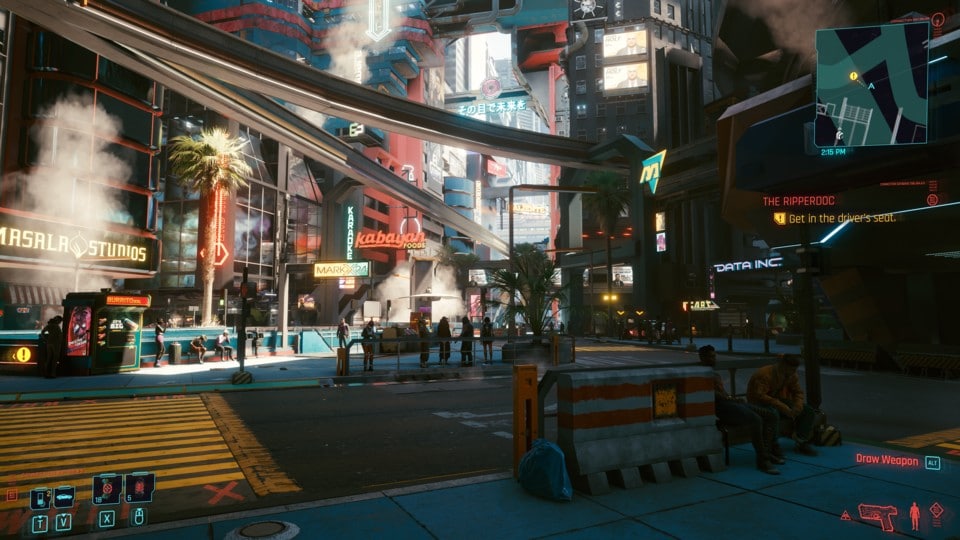
For some fans, the cyberpunk setting of the game has always been too colourful. If you share this opinion, the mod (Darker Lighting) is worth a look. This mod not only changes the brightness and contrast, but also the colouring. This indeed makes the game look darker and more realistic in many places. Don’t you think?
Simple Realistic
You don’t like it darker, but lighter? We have the right recipe for that too: This mod is called (Simple Realistic) and brightens up the picture. Especially in darker corners, the result provides clearer details. Here is a comparison picture:
How to install the mod: This is a preset for ReShade. We described what this tool is and how to install it at the beginning of the article. After downloading Simple Realistic, all you have to do is copy the contents of the ZIP archive into your Cyberpunk 2077 game directory, which you will find by default under the following path:
- Steam: C:\Program Files (x86)\Steam\steamapps\common\Cyberpunk 2077
- GOG: C:\Program Files (x86)\GOG Galaxy\Games\Cyberpunk 2077
Autonomous ReShade – True HDR
Continue with the ReShade preset called Autonomous ReShade – (True HDR). However, please do not let the name tag blind you to the fact that such solutions are never true HDR, as you simply need compatible hardware, i.e. a bright enough display.
This preset, as the name already suggests, focuses on making the lighting appear brighter and gaudier overall, which also intensifies colourful colours in particular.
How to install the mod: This is a preset for ReShade. We described what this tool is and how to install it at the beginning of the article. After downloading Autonomous ReShade, all you have to do is copy the contents of the ZIP archive into your Cyberpunk 2077 game directory, which you will find by default under the following path:
- Steam: C:\Program Files (x86)\Steam\steamapps\common\Cyberpunk 2077
- GOG: C:\Program Files (x86)\GOG Galaxy\Games\Cyberpunk 2077
Borderlandfy2077
If you want to experience Cyberpunk 2077 in a completely different look, you should download the ReShade profile called Boderlandfy2077. This gives the game a cel-shaded look and almost looks like part of the popular Borderlands series.

How to install the mod: This is a preset for ReShade. We described what this tool is and how to install it at the beginning of the article. After downloading Borderlandfy2077, all you have to do is copy the contents of the ZIP archive into your Cyberpunk 2077 game directory, which you will find by default under the following path:
- Steam: C:\Programs (x86)\Steam\steamapps\common\Cyberpunk 2077
- GOG: C:\Program Files (x86)\GOG Galaxy\Games\Cyberpunk 2077
Alternative Character Lighting
The mod (Alternative Character Lighting) has set itself the goal of making the faces of characters in dialogue as well as their clothing appear more realistic. For this purpose, the mod removes certain light sources, which is sometimes more, sometimes less visible depending on the location. Basically, the darker the environment, the more noticeable the reduced character lighting.
This is how you install the mod: Download the mod and unpack the archive into the respective game directory, which you will find by default under the following path:
- Steam: C:\Program Files (x86)\Steam\teamapps\common\Cyberpunk 2077
- GOG: C:\Program Files (x86)\GOG Galaxy\Games\Cyberpunk 2077
If Windows asks you if you want to overwrite the file AltCharLighting.ini, confirm with Yes. But remember to save the original file first so that you can quickly and easily undo the changes made by the mod if you are not convinced by them.
Performance Mods
Optimised Raytracing
The mod (Optimised Raytracing) is very popular among players who rely on ray tracing. It is supposed to improve the performance when real-time ray tracing is activated and still maintain the great look.
In a short test, the mod actually proved helpful. On our test system with Nvidia Geforce RTX 3080, we get 37.4 FPS at 4K resolution, Raytracing Preset Ultra and the DLSS quality mode. With the mod, we achieve an average of 43.8 FPS in the selected test sequence – an increase of around 17 percent.
How to install the mod:
- Download the mod via the link above
- Unpack the archive and copy the file optimizedRT.ini into the folder \Cyberpunk 2077\engine\config\platform\pc
If you want to deactivate the mod again, simply delete the file optimisedRT.ini.
Important: For the mod to work, you must also activate ray tracing in the game itself. However, the individual effects must be switched off, otherwise your frame rate can drop massively.
Config Overhaul
If the game’s internal settings menu is not enough to adjust the game’s performance to your preferences, the mod (Config Overhaul) may help. It gives you access to all graphics options, clearly presented in a tabular list. This also includes options that are not even offered to you in the game.
How to install the mod: After downloading, unpack the archive into your installation directory. Then start the mod via the file ConfigOverhaulCyberpunk.exe.
